• List of iSCSI Mutual CHAP Posts by OS
  • Tools and Utilities for Windows
  • Unix and Linux Distros

slice2

slice2

Category Archives: ESXi

VMware Tools Public Repository

01 Saturday Nov 2014

Posted by Slice2 in ESXi, VMware

≈ Leave a comment

Tags

ESXi, VMware

This URL is the public root folder for all versions of VMware tools for each OS that is supported by that version. Bookmark it. This is very handy when you don’t have the media, access to ESXi, ability to mount an ISO, or whatever problem you may have.

https://packages.vmware.com/tools/esx/index.html


Using vSphere Update Manager to deploy HP Drivers and Patches for ESXi 5

05 Sunday Jan 2014

Posted by Slice2 in ESXi, HP, VMware

≈ Leave a comment

Tags

ESXi, HP, VMware

This post demonstrates how to add your server vendor’s (in this case HP) VMware VIBs to VMware vSphere Update Manager. This allows you to apply drivers, patches and updates specific to your server platform directly to ESXi. You use the same workflow as you would a VMware patch: scan for updates and remediate host. Its that simple.

Many server vendors release OEM Customized Installers for ESXi5. Its a good idea to use them because they include the necessary drivers and integration for ESXi. Ever wonder why you don’t have good detection of hardware on the Host’s Hardware Status tab (View: Sensors)?  Use the OEM version of ESXi and you will. For this post I use ESXi5.1 on HP DL360G5 servers.

For reference, using the URL below, you go to the VMware ESXi download site, select your ESXi version, click the Custom ISO tab and then click >OEM Installer CDs to expand the category. Select your vendor and that’s the ISO you should use when you install or upgrade ESXi.

HPvibdepot-000

For ESXi 5.1 the URL is:
https://my.vmware.com/web/vmware/info/slug/datacenter_cloud_infrastructure/vmware_vsphere/5_1#custom_iso

Now, on to the reason for this post. The HP VIBs are posted to the sites below.

HP VIBs Home page:
http://vibsdepot.hp.com/

Root of the HP VIBs.
http://vibsdepot.hp.com/hpq/

VIBs index used in this post for ESXi 5.1:
http://vibsdepot.hp.com/hpq/sep2013/index.xml

1) Login to vCenter. Select Home > under Solutions and Applications select Update Manager.

HPvibdepot-00

2) On the Configuration tab, select Download Settings. Under Download Sources, click Add Download Sources on the right.

HPvibdepot-01

3) Enter your Source URL and a description. In this case its http://vibsdepot.hp.com/hpq/sep2013/index.xml. Click Validate URL and when successful click OK.

HPvibdepot-02

a) Note: as of the date of this post, Sept 2013 is the latest VIB update for ESXi 5.1. Using the root URL above (http://vibsdepot.hp.com/hpq/) you simply select the latest date in the directory for the version of ESXi you are running. That way you only download what you need.

4) Back on the Download Settings page, click Apply. This creates the Download source.

HPvibdepot-03

5) Click the Download Now button to start the download. Click OK on the Download Task pop-up window.

HPvibdepot-04

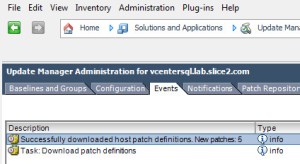
6) Select the Events tab. This is where you can see how many patches were downloaded.

HPvibdepot-05

7) On the patch repository page, sort by vendor and you can see the patches that were downloaded. Note that the patches are automatically added to the Critical and Non-Critical Host Patches baselines. Make sure they are attached to your Datacenter or Hosts.

HPvibdepot-06

8) Right-click your Cluster and select Scan for Updates. Select Patches and Extensions as well as Upgrades and click Scan to scan your hosts.

9) Since this process will update drivers and possibly the ESXi kernel (security and bug fixes), its a good idea to patch one host to verify stability. Place a Host into maintenance mode (right-click Host > Enter Maintenance Mode). When done right-click the host and select Remediate. Select Critical and Non Critical Baselines (on the right) and then complete the Wizard based on your shop’s patching practices.

10) After the host reboots and comes online in vCenter, make sure it’s functional. Verify vMotion, VMkernel Ports, Datastores, etc., check the Host’s Hardware Status tab and see if you notice that additional hardware sensors are now available. If everything is good, continue to remediate your Hosts.

As a side note, if you are in a secure location that does not allow internet access, you could download the patches and index file, stage them with HFS and and download them into Update Manager. For reference, see my HFS post for NetApp’s ONTAP upgrade here.

HOWTO Boot or Power On vSphere 5.x VMs from the Command Line

11 Wednesday Dec 2013

Posted by Slice2 in ESXi, VMware

≈ Leave a comment

Tags

ESXi, VMware

Sometimes you have to boot your VMs from the command line. This can happen when you have a power failure, or possibly as part of detailed start-up/shutdown procedures. No matter the reason getting familiar with, and documenting this option is a good best practice. In fact, creating a few dummy VMs to learn this process is even better.

Perform the following at either the ESXi console or via SSH Putty/xterm session.

1) To power on a VM from the command line, find the inventory ID of the VM. The first column is the VMID.
> vim-cmd vmsvc/getallvms |grep <name of your vm>

Or, if you just want to list them all, use getallvms.
> vim-cmd vmsvc/getallvms

Vmid  Name         File                                                Guest     Version
5       vcentersql  [vms] vcentersql/vcentersql.vmx   winSrv64Guest  vmx-09
8       labdc01      [vms] labdc01/labdc01.vmx           winSrv64Guest  vmx-09
10     splunk         [vms] splunk/splunk.vmx              winSrv64Guest  vmx-09
11     Kali105        [vms] Kali105/Kali105.vmx           deb664Guest   vmx-08
12     nessus        [vms] nessus/nessus.vmx            deb664Guest   vmx-08

2) Check the power state of the virtual machine you need to boot. In this case, I need to boot the Domain Controller first so I choose the Vmid 8 from the list above
> vim-cmd vmsvc/power.getstate 8
Retrieved runtime info
Powered off

3) Now that you have the Vmid and know the current state, boot the VM.
> vim-cmd vmsvc/power.on 8
Powering on VM

4) Check the process. Note that this command will only list your started and running VMs.
> esxcli vm process list
labdc01
World ID: 52680
Process ID: 0
VMX Cartel ID: 52669
UUID: 42 27 d6 f3 45 20 22 52-cb d2 b7 e1 c4 13 1a f4
Display Name: labdc01
Config File: /vmfs/volumes/9faff676-f7876623/labdc01/labdc01.vmx

4) Verify that the VM is up. Also verify on the VM Console or if Windows, RDP into the VM. Note that if your vCenter is not up, use the vSphere Client to login directly to the ESXi Host to check the VM console.
> vim-cmd vmsvc/power.getstate 8
Retrieved runtime info
Powered on

For reference, if you need to power off, reset or reboot a VM from the command line:

1) Get the Vmid from the output of getallvms.
> vim-cmd vmsvc/getallvms

2) Using the Vmid of the above command for the VM you want to control,  choose the command below based on the action you want to take (reboot, shutdown or reset).
> vim-cmd vmsvc/power.reboot <vmid>
> vim-cmd vmsvc/power.reset <vmid>
> vim-cmd vmsvc/power.shutdown <vmid>

Adding a new local disk to ESXi and formatting with VMFS

20 Wednesday Mar 2013

Posted by Slice2 in ESXi, VMware

≈ 1 Comment

Tags

ESXi, VMware

Need to add a disk to an ESXi 5x server and format as VMFS? Here is how you do it from the ESXi CLI. Enable ssh on the ESXi host in vCenter and login as root via xterm or putty. This was done on an HP DL360.

1) Find your disks.

> ls /vmfs/devices/disks/
-or
> esxcfg-scsidevs -c

The new disk is: mpx.vmhba1:C0:T1:L0

2) Create a partition.

> fdisk /vmfs/devices/disks/mpx.vmhba1:C0:T1:L0
Select: m
Select: l
Command (m for help): n
Command action
e   extended
p   primary partition (1-4)
Select: p
Partition number (1-4): 1
First cylinder (1-8920, default 1): Using default value 1
Last cylinder or +size or +sizeM or +sizeK (1-8920, default 8920): Using default value 8920

Command (m for help): p

Disk /vmfs/devices/disks/mpx.vmhba1:C0:T1:L0: 73.3 GB, 73372631040 bytes
255 heads, 63 sectors/track, 8920 cylinders
Units = cylinders of 16065 * 512 = 8225280 bytes

Device Boot      Start         End      Blocks  Id System
/vmfs/devices/disks/mpx.vmhba1:C0:T1:L0p1             1      8920  71649868+  83  Linux

Command (m for help): w
The partition table has been altered!

Command (m for help): t
Selected partition 1
Hex code (type L to list codes): l

0 Empty                             1c Hidden W95 FAT32 (LBA)     a5 FreeBSD
1 FAT12                              1e Hidden W95 FAT16 (LBA)     a6 OpenBSD
4 FAT16 <32M                 3c Part.Magic recovery                 a8 Darwin UFS
5 Extended                        41 PPC PReP Boot                         a9 NetBSD
6 FAT16                              42 SFS                                             ab Darwin boot
7 HPFS/NTFS                   63 GNU HURD or SysV               b7 BSDI fs
a OS/2 Boot Manager      80 Old Minix                                 b8 BSDI swap
b Win95 FAT32                 81 Minix / old Linux                    be Solaris boot
c Win95 FAT32 (LBA)      82 Linux swap                              eb BeOS fs
e Win95 FAT16 (LBA)      83 Linux                                         ee EFI GPT
f Win95 Ext’d (LBA)         84 OS/2 hidden C: drive             ef EFI (FAT-12/16/32)
11 Hidden FAT12                85 Linux extended                        f0 Linux/PA-RISC boot
12 Compaq diagnostics      86 NTFS volume set                    f2 DOS secondary
14 Hidden FAT16 <32M    87 NTFS volume set                    fd Linux raid autodetect
16 Hidden FAT16                8e Linux LVM                               fb VMFS
17 Hidden HPFS/NTFS     9f BSD/OS                                     fc VMKcore
1b Hidden Win95 FAT32   a0 Thinkpad hibernation

Hex code (type L to list codes): fb
Changed system type of partition 1 to fb (VMFS)

Command (m for help): w
The partition table has been altered!

3) Create the filesystem.

> vmkfstools -C vmfs5 -b 1m -S <new datastore name here> /vmfs/devices/disks/mpx.vmhba1:C0:T1:L0:1

VMFS5 file system creation is deprecated on a BIOS/MBR partition on device ‘mpx.vmhba1:C0:T1:L0:1’
Checking if remote hosts are using this device as a valid file system. This may take a few seconds…
Creating vmfs5 file system on “mpx.vmhba1:C0:T1:L0:1” with blockSize 1048576 and volume label “Datastore name”.
Successfully created new volume: 512bee4b-d5bd5128-568e-0015174b0172

4) Done.

Follow Blog via Email

Enter your email address to follow this blog and receive notifications of new posts by email.

Recent Posts

  • Patch Alma Linux 8.7 on an Offline or Air-Gapped System
  • HOWTO Remove /home logical volume and add that space to the root partition
  • Patch Rocky Linux 8.6 on an Offline or Air-Gapped System
  • HOWTO Install the Splunk Universal Forwarder on FreeBSD
  • HOWTO install a Splunk Universal Forwarder on Solaris 11 SPARC and x64 Using pkg(p5p) and tar
  • HOWTO install a Splunk Universal Forwarder on Solaris 10 SPARC and x64 Using pkgadd and tar
  • Recover Files from a Windows NTFS partition using Linux based SystemRescue
  • Sysmon Event ID 1 Process Creation rules for Splunk Universal Forwarder and McAfee All Access
  • Upgrading CentOS 7.2003 to 7.2009 on an Offline or Air-Gapped System
  • HOWTO Easily Resize the Default LVM Volume on Ubuntu 18.04
  • Create a Docker Container for your Cisco ESA, SMA or WSA Offline Content Updates
  • Apply the Mozilla Firefox STIG to Firefox on Ubuntu Linux 18.04
  • Dynamically Resize Those Tiny BlackArch Linux Terminals and Add a Scrollbar
  • Kali Linux OVA for Air-Gapped Use Build Process
  • HOWTO install the XFCE 4 Desktop on NetBSD 8.1
  • Build a Kali Linux ISO with the latest OS patches and packages
  • HOWTO quickly STIG Firefox 59.01
  • HOWTO mount a Synology NAS SMB share on Linux with SMBv1 disabled
  • Howto safely delete the WSUS WID on Windows 2012R2
  • HOWTO quickly STIG Firefox 45.0.1
  • Completing the vSphere vCenter Appliance Hardening Process
  • HOWTO install the XFCE 4.12 Desktop on NetBSD 7
  • Enabling TLS 1.2 on the Splunk 6.2x Console and Forwarders using Openssl and self signed certs.
  • HOWTO enable SSH on a Cisco ASA running 9.1.x
  • Apply a Windows 2012 R2 Domain GPO to a standalone Windows 2012 R2 server
  • Enable legacy SSL and Java SSL support in your browser for those old, crusty websites
  • HOWTO update FreeBSD 10.1 to the latest 11-current release
  • HOWTO Secure iSCSI Luns Between FreeBSD 10.1 and NetApp Storage with Mutual CHAP
  • HOWTO install the XFCE 4 Desktop on NetBSD 6.1.5
  • HOWTO Secure iSCSI Luns Between Ubuntu Server 14.10 and NetApp Storage with Mutual CHAP

Categories

  • Cisco (2)
  • ESXi (4)
  • FreeBSD (2)
  • HP (5)
  • iSCSI (12)
  • Linux (31)
  • Nessus (3)
  • NetApp (31)
  • NetBSD (10)
  • Oracle (9)
  • Security (48)
  • Solaris (9)
  • Splunk (5)
  • VMware (19)
  • Windows (20)
  • Wireshark (4)
  • XFCE (3)

Archives

  • February 2023
  • August 2022
  • July 2022
  • April 2022
  • March 2022
  • February 2022
  • January 2022
  • November 2021
  • January 2021
  • December 2020
  • November 2020
  • August 2020
  • May 2020
  • September 2019
  • August 2019
  • March 2018
  • November 2016
  • March 2016
  • January 2016
  • November 2015
  • July 2015
  • June 2015
  • February 2015
  • January 2015
  • December 2014
  • November 2014
  • October 2014
  • September 2014
  • August 2014
  • July 2014
  • May 2014
  • April 2014
  • March 2014
  • February 2014
  • January 2014
  • December 2013
  • November 2013
  • October 2013
  • September 2013
  • August 2013
  • July 2013
  • June 2013
  • May 2013
  • April 2013
  • March 2013

Blogroll

  • Adobe Security Bulletins
  • CentOS Blog
  • Cisco Security Blog
  • CSO Magazine
  • DHS National Vulnerability Database
  • Eric Sloof's NTPRO
  • HT SSL Tests
  • Intel Corp Security Advisories
  • Internet Usage World Stats
  • Kali Linux Blog
  • Linux Mint Blog
  • Meltdown and Spectre
  • Microsoft Security Blog
  • Microsoft Security Intelligence Report
  • Microsoft Security Research & Defense
  • Microsoft Security Response Center
  • MITRE CVE Site
  • NetApp Blogs
  • NetBSD Blog
  • Oracle OTN Security
  • Oracle Security Blog
  • PacketStorm
  • Redhat Security Blog
  • SC Magazine
  • Shodan Search Engine
  • US-CERT Alerts
  • US-CERT Bulletins
  • US-CERT Vulnerability Notes KB
  • VMware Blogs
  • VMware Security Advisories

Category Cloud

Cisco ESXi FreeBSD HP iSCSI Linux Nessus NetApp NetBSD Oracle Security Solaris Splunk VMware Windows Wireshark XFCE

Follow Blog via Email

Enter your email address to follow this blog and receive notifications of new posts by email.

Join 38 other subscribers

Powered by WordPress.com.


Loading Comments...