• List of iSCSI Mutual CHAP Posts by OS
  • Tools and Utilities for Windows
  • Unix and Linux Distros

slice2

slice2

Category Archives: Windows

Recover Files from a Windows NTFS partition using Linux based SystemRescue

11 Tuesday Jan 2022

Posted by Slice2 in Linux, Security, Windows

≈ 2 Comments

SystemRescue (formerly named SystemRescueCd) is a bootable Linux rescue toolset for repairing or manipulating your partitions and data on a disk. This post shows how to quickly mount a Windows NTFS file system to recover files.

1) Download the ISO and burn it to CD. Or, if you are rescuing a Windows VM, you will just mount the ISO.
https://www.system-rescue.org/Download/

2) Boot to SystemRescue. If you are working on a physical host, you may need to change you BIOS setting to boot the CD/DVD drive first. If a VM, make sure you attach the ISO and modify your boot order if needed. When presented to you, select “Boot SystemRescue using default options.” The Live CD option will load and when prompted, enter:

[root@sysrescue ~]# startx

3) The desktop will load and provide access to various tools. When the desktop is loaded, you can either enable the network or mount a USB drive to insert a file (drivers, tweaks, etc.) or retrieve files from the file system. Depending on the method you choose, see Network Access or USB Drive Access below for the steps.

a) Network Access. In the lower right corner, right-click the rotating swoosh and green dots icon and select edit connections. Select Wired Connection 1 and click the gear icon at the bottom. On the IPv4 Settings tab, select Method, then Manual, click Add and enter an IP address, Mask, Gateway, DNS (if DNS is needed) and click Save. It can take about 10 seconds for the settings to apply and the network service to restart. Ping to verify that it is up.

b) To quickly enable SSH/SCP/SFTP and securely harvest files over the network:
[root@sysrescue ~]# systemctl enable sshd
[root@sysrescue ~]# systemctl start sshd
[root@sysrescue ~]# systemctl disable iptables
[root@sysrescue ~]# systemctl stop iptables
[root@sysrescue ~]# passwd (to reset the root password)

c) Launch an Xterm, Putty or Powershell on a remote host to verify access. For example in an xterm or Powershell:
> ssh root@ip.you.assigned.above

d) If using Filezilla: to drag and drop/copy files to or from, enter these parameters and click QuickConnect.
Host: sftp://ip.you.assigned.above
Username: root
Password: root’s password
Port: 22

e) USB Drive Access. Insert a USB drive to the physical host or attach a USB device to a VM. In this case, the device ID below a simple 2 GB, vfat formatted PNY USB stick.
[root@sysrescue ~]# blkid (to find your USB device such as the one listed below on /dev/sdb1)

/dev/sdb1: LABEL=”SYSRCD-5″ UUID=”90BB-72F0″ BLOCK_SIZE=”512″ TYPE=”vfat” PARTUUID=”04aa1751-01″

f) Mount the USB device. Once mounted, you can move or copy files to or from the /usbdrive mount point.
[root@sysrescue ~]# mkdir /usbdrive
[root@sysrescue ~]# mount /dev/sdb1 /usbdrive
[root@sysrescue ~]# ls -l /usbdrive
drwxr-xr-x 2 root root 4096 Nov 22 2019 ‘System Volume Information’

4) Check for the Windows partition.
[root@sysrescue ~]# blkid | grep ntfs
/dev/sda2: BLOCK_SIZE=”512″ UUID=”ECF28F77F28F44B4″ TYPE=”ntfs” PARTUUID=”03fdd544-02″
/dev/sda1: LABEL=”System Reserved” BLOCK_SIZE=”512″ UUID=”240E8ECC0E8E9688″ TYPE=”ntfs” PARTUUID=”03fdd544-01″

a) See /dev/sda1 in the list? The partition with LABEL=”System Reserved” is not the one you want to mount. In this case, /dev/sda2 is the Windows OS partition with all of your files, logs, registry, etc.

b) Create a mountpoint and mount the Windows partition.
[root@sysrescue ~]# mkdir -pv /mnt/windows
[root@sysrescue ~]# ntfs-3g /dev/sda2 /mnt/windows

c) Check the new mountpoint.

[root@sysrescue ~]# cd /mnt/windows
[root@sysrescue /mnt/windows]# ls -l
drwxrwxrwx 1 root root 0 Aug 22 2013 ‘$Recycle.Bin’
-rwxrwxrwx 1 root root 427680 Aug 22 2013 bootmgr
-rwxrwxrwx 1 root root 1 Jun 18 2013 BOOTNXT
lrwxrwxrwx 2 root root 23 Aug 22 2013 ‘Documents and Settings’ -> /mnt/windows/Users
-rwxrwxrwx 1 root root 2147483648 Dec 17 20:51 pagefile.sys
drwxrwxrwx 1 root root 0 Aug 22 2013 PerfLogs
drwxrwxrwx 1 root root 4096 Dec 16 19:07 ProgramData
drwxrwxrwx 1 root root 4096 Dec 16 18:37 ‘Program Files’
drwxrwxrwx 1 root root 4096 Apr 16 2021 ‘Program Files (x86)’
drwxrwxrwx 1 root root 0 Nov 27 2020 ‘System Volume Information’
drwxrwxrwx 1 root root 0 May 24 2021 temp_share
drwxrwxrwx 1 root root 4096 Nov 27 2020 Users
drwxrwxrwx 1 root root 0 Nov 27 2020 vboxshare
drwxrwxrwx 1 root root 24576 Dec 17 20:52 Windows

d) You can also launch the GUI File Manager (Thunar) and simply double-click into the /mnt/windows folder. Click the blue X where the Windows Start icon would normally be > select File Manager. Under Devices select File System and then double-click the “mnt” folder and then the “windows” folder. Launch another File Manager window and you can simply drag and drop between the “windows” and “usbdrive” folders.

5) Files of interest. For troubleshooting a broken system, check the following locations.

a) User and log files.
/mnt/windows/Users/<your_username>/Documents
/mnt/windows/Users/<your_username>/Downloads
/mnt/windows/Windows/debug
/mnt/windows/Windows/Logs
/mnt/windows/Windows/Prefetch (useful if it was enabled)
/mnt/windows/Windows/System32/drivers (to remove a buggy driver)
/mnt/windows/Windows/System32/drivers/etc/hosts (to see if IPs were defined)
/mnt/windows/Windows/System32/LogFiles
/mnt/windows/Windows/System32/winevt/Logs (for all of the Windows Event Viewer Logs)

b) Registry files:
/mnt/windows/Windows/System32/config

6) When done, unmount the folders and reboot/shutdown. Change your directory first and umount.
[root@sysrescue /mnt/windows]# cd /
[root@sysrescue ~]# umount /mnt/windows
[root@sysrescue ~]# umount /usbdrive

a) Shutdown the host. Click the blue X in the lower left > Log out > Shutdown.

Howto safely delete the WSUS WID on Windows 2012R2

11 Friday Nov 2016

Posted by Slice2 in Windows

≈ 4 Comments

For whatever reason, you have a Windows 2012R2 WSUS database that is full of unwanted patch data or legacy products and you want to start over without breaking IIS and ruining your weekend. You have tried to remove the WSUS role and you still have old data showing up. This simple Howto will purge your WID and content so you can start over with a fresh DB.

1) Uninstall WSUS. Server Manager > click Manage > Remove Roles and Features > Next > Next > select Windows Server Update Services, click Next and finish the wizard.

2) My WSUS content was installed on the D:\ drive of my server. Yours may be different. Inside the D:\WSUS\ folder, delete the WsusContent folder. Also make sure there are no files in the D:\WSUS\UpdateServicesPackages folder.

3) You need a SQL access tool. If you don’t have the SQL Management client tools installed, download the components below and install them in the order posted (ODBC first, cli utils second). They are a small subset that provide enough functionality to access the WSUS WID from the cli without the need for overblown GUIs and multiple .NET packages (plus about 20 additional patches).

Microsoft ODBC Driver 13.1 for SQL Server
https://www.microsoft.com/en-us/download/details.aspx?id=53339
Make sure you select the x64 bit version when prompted \amd64\msodbcsql.msi

Microsoft Command Line Utilities 13.1 for SQL Server
https://www.microsoft.com/en-us/download/details.aspx?id=53591
Make sure you select the x64 bit version when prompted \amd64\MsSqlCmdLnUtils.msi

4) Create the SQL drop command file. Launch notepad.exe and paste the SQL syntax below into a new file called wsuspurge.sql. Save it to c:\temp or the location of your choice. I use c:\temp. Note that notepad.exe appends the .txt file extension to the file. That’s OK.

select name from sys.sysdatabases
drop database susdb
select name from sys.sysdatabases

5) Launch an elevated cmd.exe prompt and run the following command. The output is also shown below.

:>sqlcmd -S np:\\.\pipe\MICROSOFT##WID\tsql\query -i c:\temp\wsuspurge.sql.txt

name
———————————————————————-
master
tempdb
model
msdb
SUSDB

(5 rows affected)
name
———————————————————————–
master
tempdb
model
msdb

(4 rows affected)

6) Reinstall WSUS. Launch the WSUS Management applet and the configuration wizard will start just like it was a new installation.

Apply a Windows 2012 R2 Domain GPO to a standalone Windows 2012 R2 server

18 Saturday Jul 2015

Posted by Slice2 in Security, Windows

≈ Leave a comment

Tags

Security, Windows

This post demonstrates how to apply a Windows 2012 R2 Domain GPO to a standalone Windows 2012 R2 server that is not in the domain. For this example, I’ll use the Internet Explorer 11 (IE11) lock downs I applied using a domain GPO.

This process also worked when I applied the 2012 R2 IE policy to a standalone Windows 7 Enterprise workstation.

1) Launch Group Policy Management on the Domain Controller. Browse to the policy you want to apply to the standalone servers (in my case IE11), right-click it and select Backup. Save it to a location of your choice and give it a description, such as IE11 GPO.

2) Download and install Microsoft SCM 3.0 (not on your domain controller). I just built a VM since SCM is only needed temporarily. I was only able to get it fully installed without errors on Windows 2008 R2. It supposedly supports Vista through 2012. I opted to install the bundled SQL Express since all I want is the LocalGPO executable. No need to point to a SQL server. You can uninstall the whole thing when done. The only reason to install the full package is so you can get a copy of the LocalGPO folder. Download it from:

Security Compliance Manager (SCM) Info:
https://technet.microsoft.com/en-us/solutionaccelerators/cc835245.aspx

Download page:
https://www.microsoft.com/en-us/download/details.aspx?id=16776

a) When done downloading, double-click the Security_Compliance_Manager_Setup.exe > click Run > deselect Always check for SCM baseline updates (you don’t care about them right now) and click Next > accept the license and click Next > Next > Next > accept the SQL Express license and click Next > Install > Finish. The app will auto-load the baselines. Just let it finish.

b) When done installing, browse to C:\Program Files (x86)\Microsoft Security Compliance Manager. Copy the LocalGPO folder to a location of your choice. You will need to install the executable in this folder on each standalone server that will receive the Domain GPO.

5) Login as a local admin on the server to receive the GPO. Install LocalGPO on your standalone server. When done, browse to the C:\Program Files (x86)\LocalGPO folder, right-click LocalGPO.wsf, select Properties, select the Security tab and give your admin user full control of the file.

6) Create a folder on this server called c:\gpos. Copy your IE11 GPO backup folder into the c:\gpos folder.

7) Edit the LocalGPO.wsf file to recognize 2012 R2 (Windows 2012 R2 is version 6.3). Open C:\Program Files (x86)\LocalGPO\LocalGPO.wsf in notepad (right-click > Edit). Search for 6.2. On the first instance of 6.2, change it to 6.3.

From this: If(Left(strOpVer,3) = “6.2”) and (strProductType <> “1”) then

To this: If(Left(strOpVer,3) = “6.3“) and (strProductType <> “1”) then

8) The Windows Firewall must be running temporarily before you run this tool. Even though you may have disabled the firewall and use a third-party product like McAfee Firewall, etc., turn on the native Windows firewall in the services.msc applet now.

9) Click start (lower left corner), and then Search icon in the upper right. Enter LocalGPO. Right-click LocalGPO Command line and select Run as Administrator. Before you run the next command, close all Windows except the cmd prompt.

Enter this command:

> cscript localgpo.wsf /path:”C:\gpos\{A81C84F4-F8F5-4E8A-B077-9EA1471B3886}”

– note: your IE11 GPO backup folder name inside c:\gpos will be different. Just add your folder name in the command above.

You should see Applied valid Machine POL and Applied valid User POL. No valid audit or INF is OK.

10) Clean up after yourself. Uninstall LocalGPO if you don’t plan to use it again. Delete the gpo backup in c:\gpos.

You can run > gpupdate /force or reboot the server to apply the policy completely.

11 Verify that it applied the policy. Launch IE11 and verify your settings are locked down. Note that on a fresh system, you  may have to launch IE and then immediately close it. Launch it again and the lock downs will be set. Sometimes it takes two startups for the settings to apply. Not sure why. If you had the Windows firewall turned off, open services.msc and disable it.

HOWTO check compatability of your website on multiple platforms

02 Saturday Aug 2014

Posted by Slice2 in Linux, Windows

≈ Leave a comment

Tags

Linux, Windows

The sites listed below allow you to verify how your website renders on multiple platforms and browser combinations. Each has their advantages so check both.

http://www.browserstack.com
1) Launch a browser and enter http://www.browserstack.com/screenshots. Enter your URL, select the OS, browser version and click the orange Generate Screenshots button at the bottom of the page.

bc-1
2) The site will render your front page on each of the platforms you selected and create a thumbnail. Click an image and it opens in a larger window so you can verify that it renders properly. In this test, IE on XP and Chrome 35 on Windows 8.1 didn’t fair so well.

bc-2

http://browsershots.org/
1) What elevates browsershots.org is its support for Linux. Launch a browser and enter http://browsershots.org/. Enter your URL at the top. At the bottom you may select screen size, color depth, Javascript, Java and Flash. Just avove that you can select the OS. Next, select the browsers you want to test, or just select “all” just above the screen size drop-down box on the lower left. When you have selected your options, on the upper right click the green Submit button.

bc-3
2) The site will start rendering your selections and generate a thumbnail. Click the image to verify.

bc-4

HOWTO Create an Offline Patch ISO for Windows

27 Sunday Jul 2014

Posted by Slice2 in Windows

≈ Leave a comment

Tags

Windows

This walks you through the process of creating an ISO image of patches for your version of Microsoft Windows. This is handy for systems without internet access, standalone systems or maybe as a archive of patches just before Microsoft pulls the plug on support. A good example is Windows 2003. Its slated for EOL/EOS next year. Other scenarios include disaster recovery or forensic reconstitution.

1) Download http://download.wsusoffline.net/wsusoffline931.zip and extract it to a location of your choice. Make sure you have enough space for your patch set. To be safe, make sure you have at least 4 gigs of space for the ISO file that gets created.

2) Browse to the folder where you extracted the zip file above and double-click UpdateGenerator.exe. Select the products you need to patch. For this post, I’ll create a library for Windows 2003 to archive. On the Legacy products tab select:
a.    Select English under Windows 2003 (for x32).
b.    Select Clean up download directories.
c.    Include Service Packs.
d.    Verify Downloaded Updates.
e.    Include C++ Runtime Libraries and .NET Frameworks.
f.    Create ISO images(s) per selected product and language.
g.   Click Start to begin the download of patches. If asked to update your Root certificates, click Yes.

WSUS_ISO_1

3)  A command prompt will open and start the download process.

WSUS_ISO_2

a.  When the download is finished a popup appears. Click Yes to view the log. Scroll through the log and verify no errors.

WSUS_ISO_3

4)  When the download completes you now have a patch repository. Browse to the ISO folder where you extracted the files (….\wsusoffline\iso). You should see an .iso file in the folder. Burn that file to DVD.
a. Note: if a you are patching a VM, copy the iso file to a datastore and mount through Edit Settings CD/DVD on the VM.
b. If a phaysical server, burn to a DVD or use Daemontools, MagicISO or similar ISO mounting utility to mount the iso.WSUS_ISO_4

5) Insert the new DVD. The update installer should automatically launch. If auto launch is disabled, browse to the DVD and double-click UpdateInstaller.exe. Select the following options:
a.    Update C++ Runtime.
b.    Install .NET Framework 3.5 SP1.
c.    Update Root Certificates.
d.    Install Internet Explorer 8.
e.    Install Powershell 2.0.
f.    Update Remote Desktop Client.
g.    Verify Install Packages.
h.    Automatic reboot and recall.
i.    Click Start to begin. Offline Update scans the systems to see what updates are required.
j.    Note: If your system is quite old or a GA release, you will be prompted to manually reboot. Watch the cmd prompt that launches and check to see if it asks you to manually reboot and restart the update process. If so, simply reboot the server, login and run <cd cdrive>:\UpdateInstaller.exe again. You may be asked to do this a few times. Also, don’t forget to select “Automatic Reboot and Recall” if you are asked to launch UpdateInstaller.exe.
k.    Keep running this process until there are no more updates to apply.WSUS_ISO_5


Escape from XP Video Game

28 Wednesday May 2014

Posted by Slice2 in Windows

≈ Leave a comment

Tags

Windows

My brother sent me his link. Its funny and actually a decent game. Once XP boots, click the monitor and it blue screens. When they guy stops at the top of the hill, use the space bar to jump and arrow keys to shoot. Have fun.

http://www.modern.ie/en-us/virtualization-tools#escape-from-xp

HOWTO Find Unsigned Executables on Windows

03 Monday Mar 2014

Posted by Slice2 in Security, Windows

≈ Leave a comment

Tags

Security, Windows

From the Sigcheck website, “Sigcheck is a command-line utility that shows file version number, time stamp information, and digital signature details, including certificate chains. It also includes an option to check a file’s status on VirusTotal, a site that performs automated file scanning against over 40 antivirus engines, and an option to upload a file for scanning.” It runs on XP/2003 and higher versions of Windows.

Download sigcheck and unzip to a location of your choice. Run the commands below to get a feel for the output. When the command prompt returns, open the file in Excel, Calc or your favorite spreadsheet program. The Verified column will show “signed” or “unsigned.”

Sigcheck page:
http://technet.microsoft.com/en-us/sysinternals/bb897441

Sigcheck download:
http://download.sysinternals.com/files/Sigcheck.zip

Full Sysinternals Suite download:
http://download.sysinternals.com/files/SysinternalsSuite.zip

1) The following command scans executables only, shows extended version information, recurses sub-directories in c:\windows\system32 and writes the output to a file called sigcheck-Win7.csv.
> sigcheck -e -a -s -c c:\windows\system32 > sigcheck-Win7.csv

2) To run a check through VirusTotal, add the -v option. Note that when using the Virustotal option it may take 20 minutes or more to complete.
> sigcheck -e -a -s -v -c c:\windows\system32 > sigcheck-Win7-virustotal.csv

NetApp releases new SnapDrive and MPIO versions with support for Windows 2012 R2

08 Saturday Feb 2014

Posted by Slice2 in NetApp, Windows

≈ Leave a comment

Tags

NetApp, Windows

New versions of SnapDrive and MPIO that officially support Windows 2012 R2 have been released. See the URL’s below.

Data ONTAP DSM 4.1 for Windows MPIO
http://support.netapp.com/NOW/download/software/mpio_win/4.1/

SnapDrive 7.0.2 for Windows
http://support.netapp.com/NOW/download/software/snapdrive_win/7.0.2/

Determine what applications are using .NET on Windows with Process Explorer and Version Detector

03 Monday Feb 2014

Posted by Slice2 in Windows

≈ Leave a comment

Tags

.NET, Windows

I was asked recently whether a certain app or service required the .NET framework and while I generally knew the answer was no, I had no proof. I kept thinking, how can I determine what apps on this server were actually .NET? The following is a quick way to find those apps.

Microsoft Sysinternals Suite is an excellent set of utilities used to get under the hood of Windows and various Microsoft services. You can download the individual utilities but I just download the entire Suite. This post will use Process Explorer from the Suite but will barely scratch the surface of this powerful utility.

http://technet.microsoft.com/en-us/sysinternals/bb842062

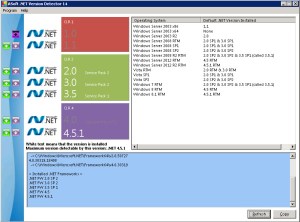
To find out what .NET assembly versions you have installed, run Asoft’s .NET Version Detector. There is more to .NET detection than just looking in Add/Remove Programs, Program Files or the Registry.

http://www.asoft.be/prod_netver.html

1) Download and unzip Asoft’s .NET Version Detector. Double-click the dotnet.exe file, click OK on the license page and it will render your versions on the left and in the lower section. On the right they conveniently provide you with the default .NET version for each Windows OS. This is a great time saver. Thanks Asoft devs!

DotNet-04

2) Download the Sysinternals Suite at the URL above or just download Process Explorer itself. Unzip and copy the procexp.chm and procexp.exe files to C:\Windows\System32 or if you don’t want to place them in System32 just park them in a location of your choice. Process Explorer is standalone so no installation is required.

3) In order to access the .NET tabs, it must be run as Administrator. I prefer to execute it from the CLI. Start > enter cmd.exe in the search field and cmd.exe will appear at the top. Right-click it and select Run As Administrator. If you didn’t place it in the System32 folder, change directories to the location of procexp.exe.  To run it just type procexp.exe and press enter. You can also just right-click the procexp.exe file and select Run As Administrator. Click Yes on the User Account Control pop-up window.

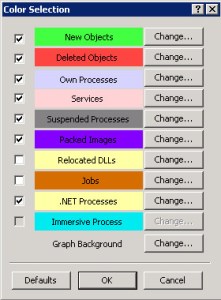
4) Select Options > Configure Colors.

DotNet-00

5) Select the check box next to .Net Processes in the yellow box and click OK. This will highlight .NET processes in yellow.

DotNet-01

6) Scroll up and down in the process column and look for yellow highlighted entries. Note that there may not be any. If you suspect that an application might be a .NET application simply start it and check the process column again for that app. In this case, the first instance I find is Microsoft AD web services.

DotNet-02

7) Right-click the service that is highlighted in yellow and select Properties. Select the .NET Assemblies and .NET Performance tabs to dig deeper into the service.

DotNet-03

8) A less useful but honorable mention goes to wmic. It provides the installed version but little else. I need to play around with it a bit more and see what I can find. Running the command below will provide the installed version and takes about 30 seconds to run.

C:\Windows\system32> wmic product where “Name like ‘Microsoft .Net%'” get Name, Version

Name                                    Version
Microsoft .NET Framework    4.5.1  4.5.50938

Using HFS Standalone Web Server to Upgrade NetApp Data ONTAP and SP Firmware

23 Monday Dec 2013

Posted by Slice2 in Linux, NetApp, Windows

≈ Leave a comment

Tags

Linux, NetApp, Windows

For a while I have been using XAMPP as my goto quick and easy web server to temporarily serve files like ONTAP or SP firmware upgrades. Its easy to use and always works. Then there was Z-WAMP which was great because it was zero install. Again easy to use and always works. The problem was they also carried the extra baggage of PHP, MySQL, etc. All I needed was a simple http instance. And then I found HFS. It stands for HTTP File Server. Its simple, incredibly small, very portable, very easy to use and is a standalone executable. No installation. Just double-click hfs.exe and you are ready to go.

HFS also works perfectly on Linux using wine 1.4 and later. Just don’t use the Wine Gecko option when prompted. On Linux, when you run >wine hfs.exe you will be prompted to download the Gecko option. Just click cancel to continue.

From a NetApp perspective, its perfect for updating Data ONTAP and SP firmware over the network. Especially for shops that don’t run CIFS or NFS or where your Security overlords won’t allow you to NFS export and mount the root volume. I run HFS from my OnCommand Unified Manager server where I have all of my NetApp tools and utilities installed.

Download HFS here:
http://www.rejetto.com/hfs/?f=dl

1) To start, double-click hfs.exe.
a) Select No to add it to your right-click menu (unless you really want to).
b) If you need to change the default port 80 perform this step. If not, skip it. In the upper left, click the Port: 80 button and change it to something like 8082. Click OK.
Notes:
– Depending on how your NetApp applications are deployed, port 80 will probably be taken. A simple port change avoids conflicts. Don’t forget to create a firewall rule if you use a non-standard port.
– If you are running this from a laptop or server without other apps using port 80, then its probably safe to leave on port 80.
– If you want to click the “You Are in Easy Mode” button to change it to “Expert Mode,” you get additional transfer details. Its up to you.
c) Copy the downloaded version of Data ONTAP you will be upgrading to onto the server where you are running HFS.
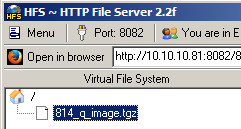
d) In the HFS window on the upper left under the house/ icon, right-click and select Add files.

hfs01
e) Browse to the Data ONTAP file and select Open. It will now be listed under the home root /. Note that you can also drag and drop the file into this window.

hfs02

2) On the NetApp controller, if not already done, create the software directory and then verify your version and backup kernel.
netapp> software
netapp> software list
netapp> version
netapp> version -b

3) Download and install the Data ONTAP image from your HFS instance. Note the :8082 port definition in the URL below. If you changed it to something other than the default port 80, you must change it on the command line as well. If not, the default port 80 is correct.
netapp> software update http://10.10.10.81:8082/814_q_image.tgz

software: You can cancel this operation by hitting Ctrl-C in the next 6 seconds.
software: Depending on system load, it may take many minutes
software: to complete this operation. Until it finishes, you will
software: not be able to use the console.
software: copying to 814_q_image.tgz
software: 5% file read from location.

<And that’s it. Output of the update truncated to shorten the post>

← Older posts

Follow Blog via Email

Enter your email address to follow this blog and receive notifications of new posts by email.

Recent Posts

  • Patch Alma Linux 8.7 on an Offline or Air-Gapped System
  • HOWTO Remove /home logical volume and add that space to the root partition
  • Patch Rocky Linux 8.6 on an Offline or Air-Gapped System
  • HOWTO Install the Splunk Universal Forwarder on FreeBSD
  • HOWTO install a Splunk Universal Forwarder on Solaris 11 SPARC and x64 Using pkg(p5p) and tar
  • HOWTO install a Splunk Universal Forwarder on Solaris 10 SPARC and x64 Using pkgadd and tar
  • Recover Files from a Windows NTFS partition using Linux based SystemRescue
  • Sysmon Event ID 1 Process Creation rules for Splunk Universal Forwarder and McAfee All Access
  • Upgrading CentOS 7.2003 to 7.2009 on an Offline or Air-Gapped System
  • HOWTO Easily Resize the Default LVM Volume on Ubuntu 18.04
  • Create a Docker Container for your Cisco ESA, SMA or WSA Offline Content Updates
  • Apply the Mozilla Firefox STIG to Firefox on Ubuntu Linux 18.04
  • Dynamically Resize Those Tiny BlackArch Linux Terminals and Add a Scrollbar
  • Kali Linux OVA for Air-Gapped Use Build Process
  • HOWTO install the XFCE 4 Desktop on NetBSD 8.1
  • Build a Kali Linux ISO with the latest OS patches and packages
  • HOWTO quickly STIG Firefox 59.01
  • HOWTO mount a Synology NAS SMB share on Linux with SMBv1 disabled
  • Howto safely delete the WSUS WID on Windows 2012R2
  • HOWTO quickly STIG Firefox 45.0.1
  • Completing the vSphere vCenter Appliance Hardening Process
  • HOWTO install the XFCE 4.12 Desktop on NetBSD 7
  • Enabling TLS 1.2 on the Splunk 6.2x Console and Forwarders using Openssl and self signed certs.
  • HOWTO enable SSH on a Cisco ASA running 9.1.x
  • Apply a Windows 2012 R2 Domain GPO to a standalone Windows 2012 R2 server
  • Enable legacy SSL and Java SSL support in your browser for those old, crusty websites
  • HOWTO update FreeBSD 10.1 to the latest 11-current release
  • HOWTO Secure iSCSI Luns Between FreeBSD 10.1 and NetApp Storage with Mutual CHAP
  • HOWTO install the XFCE 4 Desktop on NetBSD 6.1.5
  • HOWTO Secure iSCSI Luns Between Ubuntu Server 14.10 and NetApp Storage with Mutual CHAP

Categories

  • Cisco (2)
  • ESXi (4)
  • FreeBSD (2)
  • HP (5)
  • iSCSI (12)
  • Linux (31)
  • Nessus (3)
  • NetApp (31)
  • NetBSD (10)
  • Oracle (9)
  • Security (48)
  • Solaris (9)
  • Splunk (5)
  • VMware (19)
  • Windows (20)
  • Wireshark (4)
  • XFCE (3)

Archives

  • February 2023
  • August 2022
  • July 2022
  • April 2022
  • March 2022
  • February 2022
  • January 2022
  • November 2021
  • January 2021
  • December 2020
  • November 2020
  • August 2020
  • May 2020
  • September 2019
  • August 2019
  • March 2018
  • November 2016
  • March 2016
  • January 2016
  • November 2015
  • July 2015
  • June 2015
  • February 2015
  • January 2015
  • December 2014
  • November 2014
  • October 2014
  • September 2014
  • August 2014
  • July 2014
  • May 2014
  • April 2014
  • March 2014
  • February 2014
  • January 2014
  • December 2013
  • November 2013
  • October 2013
  • September 2013
  • August 2013
  • July 2013
  • June 2013
  • May 2013
  • April 2013
  • March 2013

Blogroll

  • Adobe Security Bulletins
  • CentOS Blog
  • Cisco Security Blog
  • CSO Magazine
  • DHS National Vulnerability Database
  • Eric Sloof's NTPRO
  • HT SSL Tests
  • Intel Corp Security Advisories
  • Internet Usage World Stats
  • Kali Linux Blog
  • Linux Mint Blog
  • Meltdown and Spectre
  • Microsoft Security Blog
  • Microsoft Security Intelligence Report
  • Microsoft Security Research & Defense
  • Microsoft Security Response Center
  • MITRE CVE Site
  • NetApp Blogs
  • NetBSD Blog
  • Oracle OTN Security
  • Oracle Security Blog
  • PacketStorm
  • Redhat Security Blog
  • SC Magazine
  • Shodan Search Engine
  • US-CERT Alerts
  • US-CERT Bulletins
  • US-CERT Vulnerability Notes KB
  • VMware Blogs
  • VMware Security Advisories

Category Cloud

Cisco ESXi FreeBSD HP iSCSI Linux Nessus NetApp NetBSD Oracle Security Solaris Splunk VMware Windows Wireshark XFCE

Follow Blog via Email

Enter your email address to follow this blog and receive notifications of new posts by email.

Join 38 other subscribers

Powered by WordPress.com.


Loading Comments...