• List of iSCSI Mutual CHAP Posts by OS
  • Tools and Utilities for Windows
  • Unix and Linux Distros

slice2

slice2

Category Archives: VMware

Completing the vSphere vCenter Appliance Hardening Process

19 Saturday Mar 2016

Posted by Slice2 in Linux, Security, VMware

≈ Leave a comment

Tags

Linux, Security, vCenter, VMware

The vCenter Appliance is a SuSE Linux VM that ships fully hardened by VMware to the DoD STIG specifications. There are a few site specific settings you must perform to complete the hardening. This post provides the steps to complete the process.

1) Change the root password. Login to the appliance and as root, run:
> passwd
New password:
Retype new password:
Password changed.

> cat /etc/shadow | grep root
root:$6$(truncated)

If the root password starts with a $6$ hash, this confirms it is using a sha512 hash.

2) Set password expiry. Change the root expiry from 3 years to 1 year.
> passwd -x 365 root
Password expiry information changed.

3) Execute the Dodscript.sh script.
> cd /etc/
> ./dodscript.sh
Shutting down auditd                done
Starting auditd

4) You may be a company or site that has a custom banner. If so, edit (and verify) the banners to replace the DoD language with your own.
> vi /opt/vmware/etc/isv/welcometextDoD and paste in your banner.
> cat /opt/vmware/etc/isv/welcometextDoD > /etc/issue  (linked to issue.DoD)
> cat /opt/vmware/etc/isv/welcometextDoD > /opt/vmware/etc/isv/welcometext
> cat /opt/vmware/etc/isv/welcometextDoD > /opt/vmware/etc/isv/welcometext.template

5) Configure secure shell, admin accounts, and console access on the appliance. Add a user account that can su to root:
> useradd -s /bin/bash -m -d /home/(your username) -g users -G wheel (your username)

> passwd <your username>
Changing password for (your username)
New password:
Retype new password:
Password changed.

> su – (your username) to verify.

a) Test ability to su to root and verify identity:
> su – root
Password:
Last login: Sat 19 12 12:51:26 UTC 2016 from PC on pts/1
Directory: /root
Tue Mar 19 13:18:33 UTC 2016

> whoami
root

b) Note: The step below isn’t included in the documentation but if you don’t do it you will be locked out.
> vi /etc/security/access.conf

At the end of the file change -:ALL:ALL to +:ALL:ALL

c) Test that the user you just created can login via SSH and su – root before you proceed. Use ssh cli, PuTTY, etc.
> ssh -v (your username)@(your vCenter appliance hostname or IP)
Once logged in:
> su – root

d) Disable direct root SSH access to the appliance.
> vi /etc/ssh/sshd_config

change PermitRootLogin yes to PermitRootLogin no

e) Restrict SSH to the local network of the appliance.
> vi /etc/hosts.allow and add the following:

sshd:127.0.0.1:ALLOW
sshd:[::1]:ALLOW
sshd:(the same network your appliance is on):ALLOW

f) Restart sshd to read the changes:

> service sshd restart
Shutting down SSH daemon                  done
Starting SSH daemon

g) Disable direct root console login on the appliance. This means you must first login as a user and su to root. After setting this, when you try to login on the appliance console as root, it should say login incorrect.
> vi /etc/securetty

Set the first two lines as follows:
#tty1
console

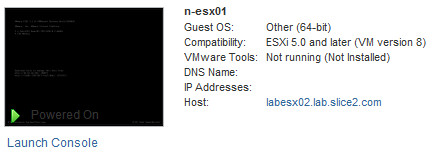
6) Verify time synchronization. Recall that NTP is configured when you first import and setup the appliance. As root, verify:

> service ntp status
remote           refid      st t when poll reach   delay   offset  jitter
=============================================
192.168.1.252    .LOCL.       1 u   37   64    1    1.145  459.906   0.001
192.168.1.252     192.168.1.253  2 u   36   64    1    1.273  464.924   0.001

Checking for network time protocol daemon (NTPD):    Running

7) Setup log forwarding with syslog-ng and auditd. Uncomment and edit the following lines to fit your remote syslog server IP address:
> vi /etc/syslog-ng/syslog-ng.conf

destination logserver { udp(“Syslog_svr_IP_Address” port(514));};
log {source(src); destination(logserver);};

a) Restart the service.
> service syslog restart
Shutting down syslog services               done
Starting syslog services

b) Send your audit data to syslog.
> vi /etc/audisp/plugins.d/syslog.conf

change active=no to active=yes

c) Restart auditd.
> service auditd restart
Shutting down auditd                         done
Starting auditd

d) Tune audit performance.
> vi /etc/audisp/audispd.conf

change the following to 1280 and 8
q_depth = 1280
priority_boost = 8

e) Control the number and rotation of log files.
> vi /etc/logrotate.d/syslog

change all entries for rotate 15 to rotate 7

> vi /etc/logrotate.d/audit

change all entries for rotate 15 to rotate 7

8) Set a boot loader or grub password.
> cat /boot/grub/menu.lst | grep password

password –md5 (a_long_hash_will_be_here)

a) Create a password for grub. This is how the sequence goes: you enter grub and run the md5crypt command to create a hashed password. Once you type in the password, the hash is presented. Copy the password hash. Run the quit command to return to the root shell.

> grub

grub> md5crypt

Password: (Enter your password here)
Encrypted: (a_long_hash_will_be_here)
grub> quit

b) Add the following to the third line of the file:
> vi /boot/grub/menu.lst

password –md5 (the password hash from above)

9) Configure NFS and NIS. If you are not using NFS or NIS, disabled the services. You probably aren’t using them.
> chkconfig ypbind off
> chkconfig nfs off
> chkconfig rpcbind off
> service ypbind stop
> service nfs stop
> service rpcbind stop

10) Reboot to refresh your system and seat all of the changes.
> reboot

VMware Tools Public Repository

01 Saturday Nov 2014

Posted by Slice2 in ESXi, VMware

≈ Leave a comment

Tags

ESXi, VMware

This URL is the public root folder for all versions of VMware tools for each OS that is supported by that version. Bookmark it. This is very handy when you don’t have the media, access to ESXi, ability to mount an ISO, or whatever problem you may have.

https://packages.vmware.com/tools/esx/index.html


VMware vSphere Client direct download links

18 Saturday Oct 2014

Posted by Slice2 in VMware

≈ Leave a comment

Tags

VMware

We’ve all been there. You need the client and you don’t have the vCenter disk. Its the weekend and your CM office is closed or you don’t have access to the site account for downloads. Below are the direct links to each client version. Just client the client version you need a save the file.

For vSphere v4.1 Clients:

  1. GA: VMware-viclient-all-4.1.0-258902.exe
  2. Update 1: VMware-viclient-all-4.1.0-345043.exe
  3. Update 2: VMware-viclient-all-4.1.0-491557.exe
  4. Update 3: VMware-viclient-all-4.1.0-799345.exe
  5. Update 3a: VMware-viclient-all-4.1.0-925676.exe

For vSphere v5.0 Clients:

  1. GA:  VMware-viclient-all-5.0.0-455964.exe
  2. Update 1: VMware-viclient-all-5.0.0-623373.exe
  3. Update 1b: VMware-viclient-all-5.0.0-804277.exe 
  4. Update 2:  VMware-viclient-all-5.0.0-913577.exe
  5. Update 3: VMware-viclient-all-5.0.0-1300600.exe

For vSphere v5.1 Clients:

  1. GA:  VMware-viclient-all-5.1.0-786111.exe
  2. Update 5.1.0b: VMware-viclient-all-5.1.0-941893.exe
  3. Update 1: VMware-viclient-all-5.1.0-1064113.exe
  4. Update 1b: VMware-viclient-all-5.1.0-1235233.exe
  5. Update 1c: VMware-viclient-all-5.1.0-1364039.exe
  6. Update 2a: VMware-viclient-all-5.1.0-1880906.exe

For vSphere v5.5 Clients:

  1. GA:  VMware-viclient-all-5.5.0-1281650.exe
  2. 5.5 Update 1: VMware-viclient-all-5.5.0-1618071.exe
  3. 5.5 Update 1b: VMware-viclient-all-5.5.0-1880841.exe
  4. 5.5 Update 2: VMware-viclient-all-5.5.0-1993072.exe

Using vSphere Update Manager to deploy HP Drivers and Patches for ESXi 5

05 Sunday Jan 2014

Posted by Slice2 in ESXi, HP, VMware

≈ Leave a comment

Tags

ESXi, HP, VMware

This post demonstrates how to add your server vendor’s (in this case HP) VMware VIBs to VMware vSphere Update Manager. This allows you to apply drivers, patches and updates specific to your server platform directly to ESXi. You use the same workflow as you would a VMware patch: scan for updates and remediate host. Its that simple.

Many server vendors release OEM Customized Installers for ESXi5. Its a good idea to use them because they include the necessary drivers and integration for ESXi. Ever wonder why you don’t have good detection of hardware on the Host’s Hardware Status tab (View: Sensors)?  Use the OEM version of ESXi and you will. For this post I use ESXi5.1 on HP DL360G5 servers.

For reference, using the URL below, you go to the VMware ESXi download site, select your ESXi version, click the Custom ISO tab and then click >OEM Installer CDs to expand the category. Select your vendor and that’s the ISO you should use when you install or upgrade ESXi.

HPvibdepot-000

For ESXi 5.1 the URL is:
https://my.vmware.com/web/vmware/info/slug/datacenter_cloud_infrastructure/vmware_vsphere/5_1#custom_iso

Now, on to the reason for this post. The HP VIBs are posted to the sites below.

HP VIBs Home page:
http://vibsdepot.hp.com/

Root of the HP VIBs.
http://vibsdepot.hp.com/hpq/

VIBs index used in this post for ESXi 5.1:
http://vibsdepot.hp.com/hpq/sep2013/index.xml

1) Login to vCenter. Select Home > under Solutions and Applications select Update Manager.

HPvibdepot-00

2) On the Configuration tab, select Download Settings. Under Download Sources, click Add Download Sources on the right.

HPvibdepot-01

3) Enter your Source URL and a description. In this case its http://vibsdepot.hp.com/hpq/sep2013/index.xml. Click Validate URL and when successful click OK.

HPvibdepot-02

a) Note: as of the date of this post, Sept 2013 is the latest VIB update for ESXi 5.1. Using the root URL above (http://vibsdepot.hp.com/hpq/) you simply select the latest date in the directory for the version of ESXi you are running. That way you only download what you need.

4) Back on the Download Settings page, click Apply. This creates the Download source.

HPvibdepot-03

5) Click the Download Now button to start the download. Click OK on the Download Task pop-up window.

HPvibdepot-04

6) Select the Events tab. This is where you can see how many patches were downloaded.

HPvibdepot-05

7) On the patch repository page, sort by vendor and you can see the patches that were downloaded. Note that the patches are automatically added to the Critical and Non-Critical Host Patches baselines. Make sure they are attached to your Datacenter or Hosts.

HPvibdepot-06

8) Right-click your Cluster and select Scan for Updates. Select Patches and Extensions as well as Upgrades and click Scan to scan your hosts.

9) Since this process will update drivers and possibly the ESXi kernel (security and bug fixes), its a good idea to patch one host to verify stability. Place a Host into maintenance mode (right-click Host > Enter Maintenance Mode). When done right-click the host and select Remediate. Select Critical and Non Critical Baselines (on the right) and then complete the Wizard based on your shop’s patching practices.

10) After the host reboots and comes online in vCenter, make sure it’s functional. Verify vMotion, VMkernel Ports, Datastores, etc., check the Host’s Hardware Status tab and see if you notice that additional hardware sensors are now available. If everything is good, continue to remediate your Hosts.

As a side note, if you are in a secure location that does not allow internet access, you could download the patches and index file, stage them with HFS and and download them into Update Manager. For reference, see my HFS post for NetApp’s ONTAP upgrade here.

Install and Configure the NetApp FAS/V-Series VASA Provider v1.0.1 for vSphere

01 Wednesday Jan 2014

Posted by Slice2 in NetApp, VMware

≈ Leave a comment

Tags

NetApp, VASA, VMware

The FAS/V-Series VASA Provider is a software component that supports the VMware VASA (vStorage APIs for Storage Awareness) framework, first introduced in vSphere 5. It acts as an information pipeline between NetApp storage systems and the vCenter Server, enabling you to monitor relevant storage system status.
FAS/V-Series VASA Provider collects data from your storage systems and delivers information about storage topology, LUN and volume attributes, and events and alarms to the vCenter Server.

1) Download the VASA Provider at the following URL:
http://support.netapp.com/NOW/download/software/vasa_win/1.0.1/

2) After it is downloaded, move the VASA provider to your server. Double-click netappvp-1-0-1-win64.exe > click Next > Next > Install. Make sure Launch VASA Configuration is selected and click Finish.

a) On the VASA Configuration window, in the upper left, enter your vCenter user and password and click Save.

b) On the right under Storage Systems, click Add. Add your storage systems that provide NFS or VMFS datastores to vCenter.

c) Under VMware vCenter, enter your vCenter FQDN, user and password and click Register Provider. Click OK on the VASA Provider Has Been Registered pop-up window and click OK to close the VASA Configuration window. Make sure the NetApp VASA Provider service is running by checking the status light shown as green. If it isn’t, manually start the service in Start > Run > services.msc.

vasa-00

3) Log out of vCenter and then log back in.

4) In vCenter, click View > Administration > Storage Providers. Under Vendor Providers, select NVP and the details will display below.

vasa-01
5) Click your Cluster > select the Storage Views tab. On the upper left of the Storage View tab next to View, click Maps. Your NetApp luns will be identified as such.

vasa-02
6) To see all of the storage profiles, click View > Management > VM Storage Profiles. At the top in the middle select Manage Storage Capabilities. The items with type “System” are now available. You are using Storage Profiles right?

vasa-03
7) Click View > Inventory > Datastores and Clusters. Select an NFS or VMFS Datastore provided by the NetApp array. On the Summary tab under Storage Capabilities, you should see System Storage Capability for that datastore. If you click the little blue call-out icon, the Storage Capabilities Details pop-up window appears.

vasa-04

HOWTO Boot or Power On vSphere 5.x VMs from the Command Line

11 Wednesday Dec 2013

Posted by Slice2 in ESXi, VMware

≈ Leave a comment

Tags

ESXi, VMware

Sometimes you have to boot your VMs from the command line. This can happen when you have a power failure, or possibly as part of detailed start-up/shutdown procedures. No matter the reason getting familiar with, and documenting this option is a good best practice. In fact, creating a few dummy VMs to learn this process is even better.

Perform the following at either the ESXi console or via SSH Putty/xterm session.

1) To power on a VM from the command line, find the inventory ID of the VM. The first column is the VMID.
> vim-cmd vmsvc/getallvms |grep <name of your vm>

Or, if you just want to list them all, use getallvms.
> vim-cmd vmsvc/getallvms

Vmid  Name         File                                                Guest     Version
5       vcentersql  [vms] vcentersql/vcentersql.vmx   winSrv64Guest  vmx-09
8       labdc01      [vms] labdc01/labdc01.vmx           winSrv64Guest  vmx-09
10     splunk         [vms] splunk/splunk.vmx              winSrv64Guest  vmx-09
11     Kali105        [vms] Kali105/Kali105.vmx           deb664Guest   vmx-08
12     nessus        [vms] nessus/nessus.vmx            deb664Guest   vmx-08

2) Check the power state of the virtual machine you need to boot. In this case, I need to boot the Domain Controller first so I choose the Vmid 8 from the list above
> vim-cmd vmsvc/power.getstate 8
Retrieved runtime info
Powered off

3) Now that you have the Vmid and know the current state, boot the VM.
> vim-cmd vmsvc/power.on 8
Powering on VM

4) Check the process. Note that this command will only list your started and running VMs.
> esxcli vm process list
labdc01
World ID: 52680
Process ID: 0
VMX Cartel ID: 52669
UUID: 42 27 d6 f3 45 20 22 52-cb d2 b7 e1 c4 13 1a f4
Display Name: labdc01
Config File: /vmfs/volumes/9faff676-f7876623/labdc01/labdc01.vmx

4) Verify that the VM is up. Also verify on the VM Console or if Windows, RDP into the VM. Note that if your vCenter is not up, use the vSphere Client to login directly to the ESXi Host to check the VM console.
> vim-cmd vmsvc/power.getstate 8
Retrieved runtime info
Powered on

For reference, if you need to power off, reset or reboot a VM from the command line:

1) Get the Vmid from the output of getallvms.
> vim-cmd vmsvc/getallvms

2) Using the Vmid of the above command for the VM you want to control,  choose the command below based on the action you want to take (reboot, shutdown or reset).
> vim-cmd vmsvc/power.reboot <vmid>
> vim-cmd vmsvc/power.reset <vmid>
> vim-cmd vmsvc/power.shutdown <vmid>

HOWTO Install VMware Tools in Nested ESXi on ESXi

10 Tuesday Dec 2013

Posted by Slice2 in VMware

≈ Leave a comment

Tags

ESXi, VMware

A new VMware Fling was release a few weeks ago and I missed it. You can now install VMware tools in your nested ESXi Hosts. It works with nested ESXi running 5.0, 5.1 or 5.5. I’m running 5.1u1 (1312873) with nested 5.1u1 for this post and it works great. I suppose this works with VMWare Workstation 10 but I haven’t tried it.

The Fling, or tools can be downloaded here.
http://labs.vmware.com/flings/vmware-tools-for-nested-esxi

Steps:

1) Login to the ESXi console and enable SSH or the ESXi Shell.
a) In vCenter, open a console on the nested ESXi VM.
b) Press F2 and login as root.
c) Scroll down to Troubleshooting Options and press Enter.
d) Select either Enable SSH (prefered) or Enable ESXi Shell and press Enter to enable.
e) If SSH, launch Putty or an Xterm and login as root. If ESXi Shell, press ALT+F1 and login as root at the console. Press ALT+F2 to get back to the ESXi DCUI.

2) Whether you logged into the Host with SSH or at the console, place the ESXi Host in maintenance mode.
> esxcli system maintenanceMode set -e true

Now, verify Maintenence Mode is enabled.
> esxcli system maintenanceMode get
Enabled

3) Launch vSphere Client and connect directly to the nested ESXi host as root.
a) On the Configuration tab , select Storage. Right-click the local datastore and select Browse datastore.
b) Click the Upload A File icon and select the esx-tools-for-esxi-9.7.0-0.0.00000.i386.vib file and click Open.
c) When done, close out of the vSphere client session.

4) Back in the ESXi Host, change to the volume (datastore) where you placed the VIB.
> cd /vmfs/volumes/<your local datastore name>
> ls -l esx-tools*  (to verify that the file is there)
> esxcli software vib install -v /vmfs/volumes/<your local datastore name>/esx-tools-for-esxi-9.7.0-0.0.00000.i386.vib -f

Installation Result
Message: The update completed successfully, but the system needs to be rebooted for the changes to be effective.
Reboot Required: true
VIBs Installed: VMware_bootbank_esx-tools-for-esxi_9.7.0-0.0.00000
VIBs Removed:
VIBs Skipped:

5) Reboot the Host and set the reason for the reboot action.
> esxcli system shutdown reboot -r “Hey, I just installed VMware Tools on nested ESXi”

6) In vCenter (Web or vSphere client), check the Summary page for the nested ESXi Host. Is should now show VMware tools installed and current. Reference images are shown below.

a) Before VMware tools (showing both Web and vSphere Client images):
WebClient-nesxi-before vSphereClient-nesxi-before

b) And after VMware tools (showing both Web and vSphere Client images):
vSphereClient-nesxi-after WebClient-nesxi-after

Using Wireshark and Splunk to find iSCSI CHAP Negotiation Failures on VMware ESXi

02 Monday Dec 2013

Posted by Slice2 in iSCSI, NetApp, Security, VMware, Wireshark

≈ Leave a comment

Tags

iSCSI, NetApp, Security, VMware, Wireshark

This is a companion post to sniffing packets in ESXi I posted here.

Say you need to isolate traffic to troubleshoot iSCSI CHAP session negotiation failures between ESXi and NetApp storage.

Using Wireshark:

1) Dump the traffic to a pcap file and open it with Wireshark.  Before you start the capture, change directories so you can easily recover the pcap file from the datastore in vCenter.

> cd /vmfs/volumes/datastore1
> tcpdump-uw -i vmk1 -s 1514 -w esxihost01.pcap
> CTRL+C
a) When done, in vCenter select the ESXi host you were sniffing packets on, then click the Configuration tab > Storage.
b) Right-click datastore1 (or the datastore were your pcap file is) and select Browse datastore.
c) Click download a file > select the location and click OK.
d) Double-click the file and it will open in Wireshark.
e) In Wireshark, in the upper left, enter iscsi.login.T in the Filter: field and click Apply. This only shows the iSCSI login packets. You can clearly see on the right in the Info column, packet 856 is an Authentication Failure packet.

wiresharkISCSIlogin

Using Splunk:

Another way to see the authentication failure is with Splunk. Assuming your NetApp storage (or any vendor) is configured to send syslog to Splunk, you can easily find the event. Splunk is an excellent Syslog server. You can download and use it for free up to 500 Megs a day indexed. I won’t go into the Splunk configuration in this post. I’ll post that soon.

Download it from here: http://www.splunk.com/download?r=header

1) Login to the Splunk UI, click Search to launch the Search app, enter the string below and the results will be displayed.

> index=”*” host=”10.10.10.11″ “iSCSI” “failed”

– Note: replace the IP address with your storage controller hostname or IP.

SplunkiSCSIlogin

Sniffing Packets on VMware ESXi 5.1 and Viewing the Capture in Wireshark

01 Sunday Dec 2013

Posted by Slice2 in VMware, Wireshark

≈ Leave a comment

Tags

VMware, Wireshark

So you need to sniff packets on ESXi 5x for troubleshooting purposes and you are not sure how to get it done. Hopefully this post will assist you. You can access the ESXI CLI from the console or via Putty/xterm by enabling SSH on the host. I prefer SSH access because the buffers in Putty/xterm make life easier.

You can use Wireshark to read the pcap files. Download and install for your OS in this way:
Windows: http://www.wireshark.org/download.html

Debian based Linux:
> apt-get install wireshark

RPM based Linux:
> yum install wireshark

1) Enable SSH on the host.
a) In vCenter, select the Host > Configuration tab > Security Profile > in the Security Profile section click Properties.
b) Scroll down to SSH and select it, then click Options > Start > OK > OK.
c) Launch an xterm or PuTTY session to the ESXi host and login as root.

2) Determine what VMKernel Ports you have on the host.
> esxcfg-vmknic -l | grep vmk
vmk0  Management Network  IPv4 10.10.10.13 255.255.255.0  10.10.10.255  00:1b:78:e0:2f:ea 1500 65535 true STATIC
vmk1  vMotion and iSCSI   IPv4 10.10.10.22 255.255.255.0  10.10.10.255  00:50:56:6f:ba:f2 1500 65535 true STATIC

2) In this case we have two.  Your production systems should have more.
vmk0 – ESXi management network. The default VMKernel Port created when you install ESXi.
vmk1 – vMotion and iSCSI. This is one I created for my LAB used for vMotion and iSCSI traffic.

3) At its most basic, specify the vmk port number and you see the packets fly by.
> tcpdump-uw -i vmk0
a) to stop, simply press CTRL+C.

Three things you need to know about tcpdump-uw:
a) tcpdump-uw only captures the first 68 bytes of data from a packet. To capture the full packet, use the -s option with a value of 1514 for normal MTU or 9014 for jumbo frames.
b) Also, tcpdump-uw can capture a max of 8138 bytes because of buffer constraints. The -B 9 option increases the buffer allowing the capture of up to 9014 bytes.
c) Captures on the vmkernel interface (vmk) only captures network traffic traversing to and from the vmkernel on that interface. It doesnt capture traffic moving across the Virtual Switch.
d) There are quite a few option for so play around with them.
> tcpdump-uw -?
tcpdump-uw version 4.0.0vmw
libpcap version 1.0.0
Usage: tcpdump-uw [-aAdDefIKlLnNOpqRStuUvxX] [ -B size ] [ -c count ]
[ -C file_size ] [ -E algo:secret ] [ -F file ] [ -G seconds ]
[ -i interface ] [ -M secret ] [ -r file ]
[ -s snaplen ] [ -T type ] [ -w file ] [ -W filecount ]
[ -y datalinktype ] [ -z command ] [ -Z user ]
[ expression ]

For example, for default MTU:
> tcpdump-uw -i vmk0 -s 1514
For Jumbo Frames:
> tcpdump-uw -i vmk0 -s 9014 -B 9

4) A few examples to get you started.
a) Dump packets on vmk0 with default MTU very verbose output showing only DNS packets (port 54).
> tcpdump-uw -i vmk0 -s 1514 -vvv port 53

b) Same as above except show NTP packets.
> tcpdump-uw -i vmk0 -s 1514 -vvv port 123

c) Is vCenter communicating properly with the ESXi host?  
> tcpdump-uw -i vmk0 -s 1514 -vvv port 902

d) Filter by transport type – TCP or UDP.
> tcpdump-uw -i vmk0 -s 1514 udp
> tcpdump-uw -i vmk0 -s 1514 tcp

e) Filter for ARP packets.
> tcpdump-uw -i vmk0 -s 1514 udp | grep ARP

5) You can dump the traffic to a pcap file and open it with Wireshark. Before you start the capture, change directories so you can easily recover the pcap file from the datastore in vCenter.

> cd /vmfs/volumes/datastore1
> tcpdump-uw -i vmk0 -s 1514 -w esxihost01.pcap
> When ready to stop capturing packets, press CTRL+C
a) When done, in vCenter select the ESXi host you were sniffing packets on, then click the Configuration tab > Storage.
b) Right-click datastore1 (or the datastore were your pcap file is) and select Browse datastore.
c) Right-click the esxihost01.pcap file > select Download, select a location and click OK.
d) Double-click the file and it will open in Wireshark.esxipacketsniff

Installing and Configuring the NetApp NFS Plug-in v1.0.20 for VMware VAAI

30 Saturday Nov 2013

Posted by Slice2 in NetApp, VMware

≈ Leave a comment

Tags

NetApp, VMware

The plug-in installs on the VMware ESXi v5x host. It takes advantage of vSphere’s enhanced storage features. On the NetApp controller, the nfs.vstorage.enable option has to be set to “on” so the ESXi host can take advantage of VMware VAAI.  This plug-in performs NFS-like RPCs to the server, using the same credentials as that of an ESXi NFS client. That means the plug-in needs no other permissions and has the same access rights as the ESXi NFS client. This is supported with DOT 8.1.1 and later.

The NFS plug-in includes these features:

Copy Offload – A process that used to take a few minutes now runs in seconds. This reduces traffic on the ESXi host and lowers CPU utilization for that task.

Space Reservation – This allows you to create thick virtual disks on NFS datastores. Through the VAAI Reserve Space primitive, you reserve space for the file when its created.

Download the plugin here: http://support.netapp.com/NOW/download/software/nfs_plugin_vaai/1.0.20/

1) Configure the NetApp Controller (this is for 7-Mode).
> options nfs.vstorage.enable on

2) In vCenter, select an ESXi host. Select the Configuration tab and then Storage under Hardware.
a) Under Datastores, right-click datastore1 (or whatever your local datastore is named) and select Browse datastore.
b) Click the Upload icon and select Upload a file. Browse to the NetAppNasPlugin.v20.zip file and click Open > Yes.

3) Enable SSH on the ESXi host or use the console CLI.
a) In vCenter, select the host > Configuration tab > Security Profile > across from Services, click Properties.
b) Scroll down to SSH and click Options. Click Start > OK > OK.

4) Verify that VAAI is enabled on the ESXi host. The output should be 1:
> esxcfg-advcfg -g /DataMover/HardwareAcceleratedMove
Value of HardwareAcceleratedMove is 1

> esxcfg-advcfg -g /DataMover/HardwareAcceleratedInit
Value of HardwareAcceleratedInit is 1

If VAAI is not enabled, enable it now:
> esxcfg-advcfg -s 1 /DataMover/HardwareAcceleratedInit
> esxcfg-advcfg -s 1 /DataMover/HardwareAcceleratedMove

5) Install the Plugin on the ESXi host.
> esxcli software vib install -d “/vmfs/volumes/<your path>/NetAppNasPlugin.v20.zip”
Installation Result
Message: The update completed successfully, but the system needs to be rebooted for the changes to be effective.
Reboot Required: true
VIBs Installed: NetApp_bootbank_NetAppNasPlugin_1.0-020
VIBs Removed:
VIBs Skipped:

6) Reboot the ESXi host. Either through vCenter or at the command line.
> reboot

7) Verify the plugin is installed on the ESXi host. You will have to re-enable SSH in vCenter.
> esxcli software vib get | grep -i NetApp
NetApp_bootbank_NetAppNasPlugin_1.0-020
Name: NetAppNasPlugin
Vendor: NetApp
Summary: NAS VAAI NetApp Plugin
Description: NetApp NAS VAAI Module for ESX Server
Payloads: NetAppNasPlugin

8) Create an NFS export on the NetApp Controller and mount it as a new NFS datastore on the ESXi host. These steps below are specific to my configuration but you should be able to figure out your variables.
a) On the NetApp:
> exportfs -p rw=10.10.10.0/24,root=10.10.10.0/24 /vol/vol1
(substitute your ESXi host IP range)

b) On the ESXi host:
> esxcli storage nfs add -H labnetapp01 -s /vol/vol1 -v DatastoreVAAI
(substitute your controller hostname, volume name and datatstore name)

9) Verify that the new datastore is VAAI supported with the following command. Look for NAS VAAI Supported: YES at the bottom of the output.
> vmkfstools -Ph /vmfs/volumes/<name-of-your-datastore>
NFS-1.00 file system spanning 1 partitions.
File system label (if any): DatastoreVAAI
Mode: public
Capacity 8 GB, 8 GB available, file block size 4 KB
UUID: 69e81cd6-90fa0446-0000-000000000000
Partitions spanned (on “notDCS”):
nfs:DatastoreVAAI
NAS VAAI Supported: YES
Is Native Snapshot Capable: YES

10) You can also verify VAAI support with the following commands.
> esxcli storage core plugin list
Plugin name       Plugin class
—————-  ————
VMW_VAAIP_NETAPP  VAAI
VAAI_FILTER       Filter
NMP               MP

> esxcli storage core claimrule list –claimrule-class=VAAI | grep NETAPP
VAAI        65433  runtime  vendor  VMW_VAAIP_NETAPP  vendor=NETAPP model=*
VAAI        65433  file     vendor  VMW_VAAIP_NETAPP  vendor=NETAPP model=*

> esxcli storage core claimrule list –claimrule-class=Filter | grep NETAPP
Filter      65433  runtime  vendor  VAAI_FILTER  vendor=NETAPP model=*
Filter      65433  file     vendor  VAAI_FILTER  vendor=NETAPP model=*

← Older posts

Follow Blog via Email

Enter your email address to follow this blog and receive notifications of new posts by email.

Recent Posts

  • Patch Alma Linux 8.7 on an Offline or Air-Gapped System
  • HOWTO Remove /home logical volume and add that space to the root partition
  • Patch Rocky Linux 8.6 on an Offline or Air-Gapped System
  • HOWTO Install the Splunk Universal Forwarder on FreeBSD
  • HOWTO install a Splunk Universal Forwarder on Solaris 11 SPARC and x64 Using pkg(p5p) and tar
  • HOWTO install a Splunk Universal Forwarder on Solaris 10 SPARC and x64 Using pkgadd and tar
  • Recover Files from a Windows NTFS partition using Linux based SystemRescue
  • Sysmon Event ID 1 Process Creation rules for Splunk Universal Forwarder and McAfee All Access
  • Upgrading CentOS 7.2003 to 7.2009 on an Offline or Air-Gapped System
  • HOWTO Easily Resize the Default LVM Volume on Ubuntu 18.04
  • Create a Docker Container for your Cisco ESA, SMA or WSA Offline Content Updates
  • Apply the Mozilla Firefox STIG to Firefox on Ubuntu Linux 18.04
  • Dynamically Resize Those Tiny BlackArch Linux Terminals and Add a Scrollbar
  • Kali Linux OVA for Air-Gapped Use Build Process
  • HOWTO install the XFCE 4 Desktop on NetBSD 8.1
  • Build a Kali Linux ISO with the latest OS patches and packages
  • HOWTO quickly STIG Firefox 59.01
  • HOWTO mount a Synology NAS SMB share on Linux with SMBv1 disabled
  • Howto safely delete the WSUS WID on Windows 2012R2
  • HOWTO quickly STIG Firefox 45.0.1
  • Completing the vSphere vCenter Appliance Hardening Process
  • HOWTO install the XFCE 4.12 Desktop on NetBSD 7
  • Enabling TLS 1.2 on the Splunk 6.2x Console and Forwarders using Openssl and self signed certs.
  • HOWTO enable SSH on a Cisco ASA running 9.1.x
  • Apply a Windows 2012 R2 Domain GPO to a standalone Windows 2012 R2 server
  • Enable legacy SSL and Java SSL support in your browser for those old, crusty websites
  • HOWTO update FreeBSD 10.1 to the latest 11-current release
  • HOWTO Secure iSCSI Luns Between FreeBSD 10.1 and NetApp Storage with Mutual CHAP
  • HOWTO install the XFCE 4 Desktop on NetBSD 6.1.5
  • HOWTO Secure iSCSI Luns Between Ubuntu Server 14.10 and NetApp Storage with Mutual CHAP

Categories

  • Cisco (2)
  • ESXi (4)
  • FreeBSD (2)
  • HP (5)
  • iSCSI (12)
  • Linux (31)
  • Nessus (3)
  • NetApp (31)
  • NetBSD (10)
  • Oracle (9)
  • Security (48)
  • Solaris (9)
  • Splunk (5)
  • VMware (19)
  • Windows (20)
  • Wireshark (4)
  • XFCE (3)

Archives

  • February 2023
  • August 2022
  • July 2022
  • April 2022
  • March 2022
  • February 2022
  • January 2022
  • November 2021
  • January 2021
  • December 2020
  • November 2020
  • August 2020
  • May 2020
  • September 2019
  • August 2019
  • March 2018
  • November 2016
  • March 2016
  • January 2016
  • November 2015
  • July 2015
  • June 2015
  • February 2015
  • January 2015
  • December 2014
  • November 2014
  • October 2014
  • September 2014
  • August 2014
  • July 2014
  • May 2014
  • April 2014
  • March 2014
  • February 2014
  • January 2014
  • December 2013
  • November 2013
  • October 2013
  • September 2013
  • August 2013
  • July 2013
  • June 2013
  • May 2013
  • April 2013
  • March 2013

Blogroll

  • Adobe Security Bulletins
  • CentOS Blog
  • Cisco Security Blog
  • CSO Magazine
  • DHS National Vulnerability Database
  • Eric Sloof's NTPRO
  • HT SSL Tests
  • Intel Corp Security Advisories
  • Internet Usage World Stats
  • Kali Linux Blog
  • Linux Mint Blog
  • Meltdown and Spectre
  • Microsoft Security Blog
  • Microsoft Security Intelligence Report
  • Microsoft Security Research & Defense
  • Microsoft Security Response Center
  • MITRE CVE Site
  • NetApp Blogs
  • NetBSD Blog
  • Oracle OTN Security
  • Oracle Security Blog
  • PacketStorm
  • Redhat Security Blog
  • SC Magazine
  • Shodan Search Engine
  • US-CERT Alerts
  • US-CERT Bulletins
  • US-CERT Vulnerability Notes KB
  • VMware Blogs
  • VMware Security Advisories

Category Cloud

Cisco ESXi FreeBSD HP iSCSI Linux Nessus NetApp NetBSD Oracle Security Solaris Splunk VMware Windows Wireshark XFCE

Follow Blog via Email

Enter your email address to follow this blog and receive notifications of new posts by email.

Join 38 other subscribers

Powered by WordPress.com.


Loading Comments...