• List of iSCSI Mutual CHAP Posts by OS
  • Tools and Utilities for Windows
  • Unix and Linux Distros

slice2

slice2

Category Archives: Windows

When a VMware Tools Upgrade Goes Bad – Fixing NICs

27 Wednesday Nov 2013

Posted by Slice2 in VMware, Windows

≈ Leave a comment

Tags

VMware, Windows

Scenario: you upgrade VMware tools on one of your VMs and your IP address will not maintain a static configuration. It reverts back to a Microsoft APIPA address (169.254.0.1 – 169.254.255.254). It’s Sunday at 9:00 PM, the outage window is closing and now you are angry.

Solution: you have to clean out all references to current and previous NICs in the registry. This post tells you how to do this for Windows 2008R2 x64. Make sure you have a local administrator account and know the password before you start. You don’t want to lock yourself out of the VM should something go haywire.

Note: Make sure your VM hardware is set to a version compatible with your version of vSphere. For this post, I’m set to version 9 (for 5.1 U1c). You can run into issues related to buggy hardware mismatches.

1) Remove the NIC and reboot the VM.
a) Right-click the VM > Edit Settings > select the NIC and click Remove > OK.

2) Delete the Interfaces and Adapters from the Registry.
a) Click Start > Run and enter regedt32 and press enter.
b) Navigate to HKEY_LOCAL_MACHINE\SYSTEM\CurrentControlSet\services\Tcpip\Parameters\Interfaces
c) Expand Interfaces and delete all entries (delete folders from the left pane).
d) Navigate to HKEY_LOCAL_MACHINE\SYSTEM\CurrentControlSet\services\Tcpip\Parameters\Adapters
e) Expand Adapters and delete all entries (delete folders from the left pane).
f) Close the registry editor and reboot the VM.

3) Add the VMXNET3 NIC back to the VM.
a) Right-click the VM > Edit Settings > click Add > select Ethernet Adapter and click Next.
b) On the Network Connection page, select the VMXNET3 adapter type, select the network you want to connect to and most importantly, DESELECT connect at power on, and then click Next > Finish > OK.
c) Reboot the VM. Don’t skip this reboot.

4) Configure your IP address.
a) Login to the VM. Click Start > Control Panel > Network and Internet > Network and Sharing Center > Change Adapter Setting.
b) Right-click the NIC > Properties > select IPv4 and click Properties.
c) Enter your IP, mask, gateway, dns and click OK > OK.
d) Right-click the VM > Edit Settings > select the NIC and in the upper right, click both Connect at power on and Connected, then click OK.
e) The NIC will connect and you should have a clean network configuration.
f) Open a cmd prompt and enter ipconfig -all to verify. Ping other hosts to test.
HOWTO Generate a new SID on Windows 2008

09 Wednesday Oct 2013

Posted by Slice2 in Security, Windows

≈ Leave a comment

Tags

Security, Windows

Despite what Microsoft has stated you need to generate a new SID when using Windows 2008 images. On Windows 2008, you can use the native sysprep.exe utility. Note that running sysprep.exe will reset your hostname, IP and local Administrator password. When done generating a new SID you have to change your hostname, password and set your IP. If you want to see the before and after SID, download the PStools package at the URL below and run psgetsid.exe before you sysprep and then after.

http://technet.microsoft.com/en-us/sysinternals/bb896649


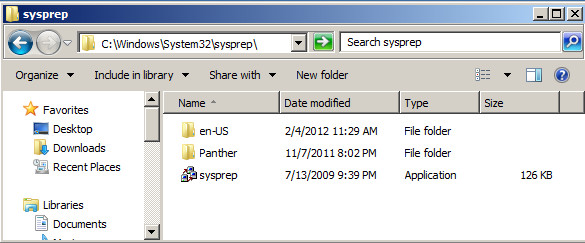
1) Open Windows explorer and browse to C:\Windows\System32\sysprep and double-click sysprep.exe.

sysprep2k8-01

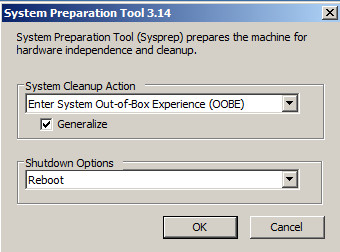
2) Make sure the Generalize option is checked under System Cleanup Action and click OK.

sysprep2k8-02

3) When the system reboots it automatically prepares it for first use.

sysprep2k8-03

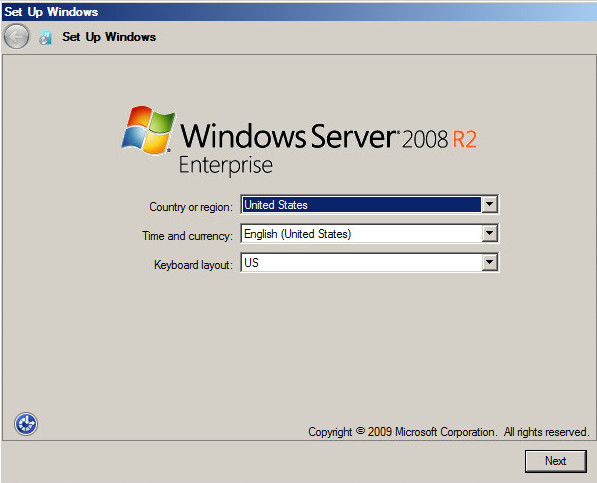
4) On the Windows Setup screen, select your county, language and click Next.

sysprep2k8-04

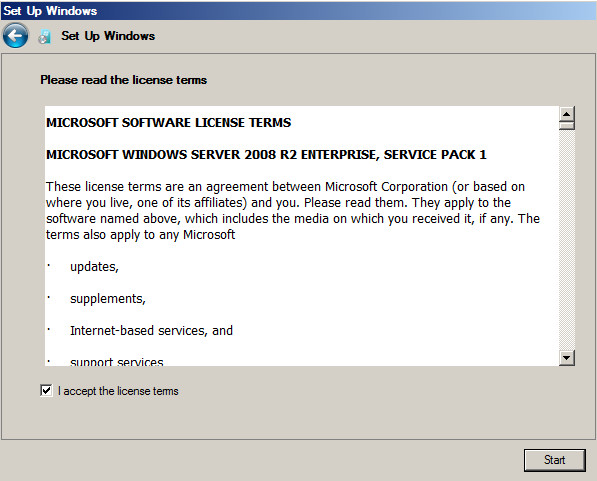
5) Accept the license and click Start.

sysprep2k8-05

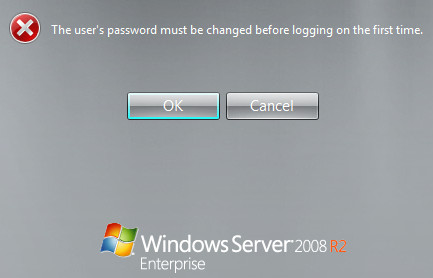
6) Click OK to set the local Administrator password.

sysprep2k8-06

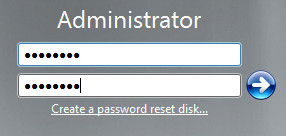
7) Enter a password and click the blue arrow to complete the setup. The system will log you in. Make sure you change your hostname and IP before you join the domain. Also, if the old server object is still in AD, delete it before joining the domain.

sysprep2k8-07

Display the iSCSI Initiator Node Name or IQN from the command line.

01 Sunday Sep 2013

Posted by Slice2 in HP, iSCSI, Linux, NetApp, NetBSD, Solaris, VMware, Windows

≈ 2 Comments

Tags

iSCSI

At some point you will be asked by a Storage Engineer for your system’s iSCSI Initiator Node Name or your iqn. This list shows you how to get your local iSCSI initiator name or iqn from the command line. This assumes the iSCSI service is installed, enabled and running. If you have a different way or want to add an OS or platform to this list simply leave a comment and I’ll add it.

AIX:
> smitty iscsi
select > iSCSI Protocol Device
select > Change / Show Characteristics of an iSCSI Protocol Device

FreeBSD (v10 and newer. Thanks to Edward Tomasz Napierala for this update):
> iscsictl -v  (only after you have established a session with your array)

HP-UX:
> iscsiutil -l

Linux:
> cat /etc/iscsi/initiatorname.iscsi

NetApp Data ONTAP: (this is a target iqn not a host iqn)
7-Mode:
> iscsi nodename

Cluster Mode from the clustershell:
> vserver iscsi show

NetBSD: (please make this easier NetBSD developers! How about an iscsictl list_initiators command?)
> iscsictl add_send_target -a <hostname or IP of your target/storage)
Added Send Target 1
> iscsictl refresh_targets
OK
> iscsictl list_targets
1: iqn.1992-08.com.netapp:sn.84167939
2: 10.1.0.25:3260,1000
> iscsictl login -P 2
Created Session 2, Connection 1
> iscsictl list_sessions
Session 2: Target iqn.1992-08.com.netapp:sn.84167939

On the NetApp filer find the initiator:
netapp01> iscsi initiator show
Initiators connected:
TSIH  TPGroup  Initiator/ISID/IGroup
4    1000   nbsd611.lab.slice2.com (iqn.1994-04.org.netbsd:iscsi.nbsd611.lab.slice2.com:0 / 40:00:01:37:00:00 / )

Solaris 11:
> iscsiadm list initiator-node

VMware ESXi 5.1:
ESXi console:
Get the devices first:
> esxcfg-scsidevs -a | grep iSCSI
Then get the iqn (in this case vmhba33 is the iSCSI device)
> vmkiscsi-tool -I -l vmhba33

esxcli:
> esxcli -s <esxihostname or ip> -u root iscsi adapter get -A vmhba33

Windows:
c:\iscsicli.exe

NetApp releases SnapDrive for Windows and SnapManager for MSSQL 7.0

30 Friday Aug 2013

Posted by Slice2 in NetApp, Windows

≈ Leave a comment

Tags

NetApp, Windows

These are major new versions with much needed support for cDOT 8.2, Powershell and SMB 3.

SnapDrive 7.0 for Windows
http://support.netapp.com/NOW/download/software/snapdrive_win/7.0/

SnapDrive 7.0 for Windows is a major release, adding support for the following features:
1) Clustered Data ONTAP 8.2
2) Sub-LUN cloning in restore operations
3) PowerShell cmdlet support in SMB 3.0 enviornments
4) Volume and share provisioning template in SMB 3.0 environments
5) Virtual Fibre Channel
6) Group Managed Service Accounts (gMSA) on Windows Server 2012

SnapManager 7.0 for Microsoft SQL Server
http://support.netapp.com/NOW/download/software/snapmanager_sql2k/7.0/

SnapManager 7.0 for Microsoft SQL Server includes several new features:
1) Support for clustered Data ONTAP 8.2.
2) Support for databases running on clustered Data ONTAP SMB 3.0 shares.
Note: Specify SMB shares with or without a closing backslash: \\ServerName\ShareName or \\ServerName\ShareName\
3) Support for archiving backups to SnapVault secondary volumes running on clustered Data ONTAP.
5) The option to restore databases to a different location on the same Microsoft SQL Server instance.
6) Performance improvements when restoring databases from a LUN that stores multiple databases.
7) The Backup report now includes the cmdlet syntax for database backups initiated from the Backup wizard or Backup and Verify option.
8) Support for running SnapManager from a group Managed Service Account.

Read these URLs to see why you should be interested in SMB 3.0.

http://blogs.technet.com/b/filecab/archive/2012/05/03/smb-3-security-enhancements-in-windows-server-2012.aspx
http://networkerslog.blogspot.com/2012/09/new-storage-space-on-smb30-in-windows.html
http://blogs.technet.com/b/windowsserver/archive/2012/04/19/smb-2-2-is-now-smb-3-0.aspx

Using pathping.exe on Windows to find latency in your network

01 Thursday Aug 2013

Posted by Slice2 in Windows

≈ Leave a comment

Tags

Windows

You suspect your network is burping because your storage replication is slow or failing, or maybe your CIFS shares have inconsistent write errors or disconnects, or you just think the network is slow as molasses. Before calling your network team and waking them from their post lunch nap, try to pinpoint the issue with pathping.exe. It has been there since Windows XP and is a little known utility.

Pathping.exe provides information about network latency and network loss at intermediate hops between a source and destination. Pathping sends multiple Echo Request messages to each router between a source and destination over a period of time and then computes results based on the packets returned from each router. Because pathping displays the degree of packet loss at any given router or link, you can determine which routers or subnets might be having network problems. Pathping performs the equivalent of the tracert command by identifying which routers are on the path. It then sends pings periodically to all of the routers over a specified time period and computes statistics based on the number returned from each.

Example:

C:\Users\me>pathping -n 212.58.251.195

Tracing route to 212.58.251.195 over a maximum of 30 hops

0  10.1.0.20
1  10.1.0.1
2  192.168.1.253
3  173.73.46.1
4  130.81.190.164
5  130.81.151.230
6  152.63.32.133
7  152.63.33.41
8  63.125.125.42
9  80.91.252.45
10  80.91.246.69
11  213.155.133.3
12  213.248.104.70
13     *        *        *
Computing statistics for 300 seconds…
Source to Here   This Node/Link
Hop  RTT    Lost/Sent = Pct  Lost/Sent = Pct  Address
0                                                                 10.1.0.20
0/ 100 =  0%   |
1    0ms     0/ 100 =  0%     0/ 100 =  0%  10.1.0.1
0/ 100 =  0%   |
2    1ms     0/ 100 =  0%     0/ 100 =  0%  192.168.1.253
0/ 100 =  0%   |
3   10ms     0/ 100 =  0%     0/ 100 =  0%  173.73.46.1
0/ 100 =  0%   |
4   14ms     0/ 100 =  0%     0/ 100 =  0%  130.81.190.164
0/ 100 =  0%   |
5   17ms     0/ 100 =  0%     0/ 100 =  0%  130.81.151.230
0/ 100 =  0%   |
6   20ms     0/ 100 =  0%     0/ 100 =  0%  152.63.32.133
0/ 100 =  0%   |
7   16ms     0/ 100 =  0%     0/ 100 =  0%  152.63.33.41
0/ 100 =  0%   |
8   45ms     0/ 100 =  0%     0/ 100 =  0%  63.125.125.42
0/ 100 =  0%   |
9   30ms     0/ 100 =  0%     0/ 100 =  0%  80.91.252.45
                                             0/ 100 =  0%   |
 10   96ms     8/ 100 =  8%     8/ 100 =  8%  80.91.246.69
0/ 100 =  0%   |
11   93ms     0/ 100 =  0%     0/ 100 =  0%  213.155.133.3
0/ 100 =  0%   |
12   89ms     0/ 100 =  0%     0/ 100 =  0%  213.248.104.70

Trace complete.

You can clearly see that between hops 9 and 10 (in red above) the RTT (round trip time) jumps to 93 milliseconds with 8% packet loss. Bingo. Point your network person to this router.

Using cipher.exe on Windows to purge deleted files for good.

20 Saturday Jul 2013

Posted by Slice2 in Security, Windows

≈ Leave a comment

Tags

Security, Windows

It’s well known that when you delete files and folders in Windows they are not technically deleted.  When you delete a file, the disk space used by these files is tagged as available for use. This allows the files to be reconstituted using various free recovery utilities such as SoftPerfect’s File Recovery or Piriform’s Recuva. The blocks must be overwritten to actually eliminate them completely.

Windows has a native utility named cipher.exe that can wipe those pointers and make sure the data is actually purged. Cipher.exe can overwrite all free space on your disk thus insuring files you have deleted and actually gone.

This is a safe utility. I have run this command many times over the years. You can also setup a scheduled task and run weekly to keep your systems clean. Launch a command prompt as administrator (right-click cmd.exe and select Run as administrator) and type the following:

c:\cipher /w:X where X is the drive letter you want to clean.

You can run this on your c:\ drive without any issues. Also note that the larger your drive, the longer this will take. For reference, a 1TB drive 3/4’s full took about 3 hours.

Example (this is on Windows 7):

C:\Windows\system32> cipher /w:c

To remove as much data as possible, please close all other applications while
running CIPHER /W.
Writing 0x00
………………………………………………………………………………………………………….
Writing 0xFF
…………………………………………………………………………………………………………..
Writing Random Numbers
…………………………………………………………………………………………………………..

C:\Windows\system32>


Further reading on cipher.exe options is available here:

http://technet.microsoft.com/en-us/library/cc771346(v=ws.10).aspx

When all you have is ping.exe.

04 Thursday Jul 2013

Posted by Slice2 in Windows

≈ Leave a comment

Tags

Windows

So you are sitting at a command prompt on a Windows 7 PC and you need to enumerate live systems on your subnet. You don’t have your normal toolbox. What’s a poor ol’ Sysadmin to do?  Try this:

c:\for /L %V in (1 1 254) do PING -n 1 your.network.%V | FIND /I “Reply”

Example:

C:\Users\me> for /L %V in (1 1 254) do PING -n 1 10.10.10.%V | FIND /I “Reply”

The output is:

C:\Users\me>PING -n 1 10.10.10.1 | FIND /I “Reply”
Reply from 10.10.10.1: bytes=32 time=1ms TTL=255

C:\Users\me>PING -n 1 10.10.10.2 | FIND /I “Reply”
Reply from 10.10.10.2: bytes=32 time=1ms TTL=128

C:\Users\me>PING -n 1 10.10.10.3 | FIND /I “Reply”
Reply from 10.10.10.3: bytes=32 time<1ms TTL=128

C:\Users\me>PING -n 1 10.10.10.4 | FIND /I “Reply”
Reply from 10.10.10.4: Destination host unreachable.

So what does this command mean. Can I break it down for you? Sure.

1) FOR /L %variable IN (start,step,end) DO command [command-parameters]

The set (in parenthesis) is a sequence of numbers from start to end, by step amount.
So (1 1 254) would generate the sequence 1 2 3 4 5 through 254 IP addresses in a /24 and (254,-1,1) would generate the sequence (5 4 3 2 1) in reverse.

2) PING -n 1

The count “Number” of echo requests to send. In this case its 1.

3) 10.10.10.%V

This is the network (/24) I am pinging. The %V variable is the for /L %V count 1, 2, 3, 4, 5, 6->254 as described in #1 above. Its pings 10.10.10.1, 10.10.10.2, 10.10.10.3, 10.10.10.4, etc., all the way to 10.10.10.254.

4) | FIND /I “Reply”

This pipes “|” the output of the ping command to FIND, the /I tells find.exe to ignore case and “Reply” is the string you are searching for. This gives you the “Reply from” string to determine if the IP is in use for unreachable.

Configuring MPIO and iSCSI Mutual CHAP on Windows 2003, Windows 2008 and Windows 2012 with NetApp storage.

02 Sunday Jun 2013

Posted by Slice2 in Security, Windows

≈ Leave a comment

Tags

Security, Windows

This is a followup to a previous post where I outlined how to deploy iSCSI LUNs using NetApp SnapDrive for Windows. This post does not use SnapDrive.

This document demonstrates how to enable MPIO, configure Mutual CHAP for iSCSI sessions, create iGroups and LUNs and then format the LUNs with NTFS.

The doc is here: Configuring MPIO and iSCSI Mutual CHAP on Windows v1

It covers Windows 2003, Windows 2008 and Windows 2012. Since Windows 2003 is quite lame, I had to use the NetApp DSM MPIO. Otherwise, its just plain old native Windows features and NetApp LUNs. All OS’s are grouped together by task so if you only need Windows 2003, just follow those steps through the document. Same for Windows 2008 or 2012.

Yes, Mutual CHAP does not provide robust crypto security but its better than nothing. It’s also a DoD STIG finding if not enabled. Its fairly easy to configure so why not use it.

Installing and configuring Microsoft iSCSI Initiator 2.08, NetApp DSM MPIO 4, NetApp SnapDrive for Windows 6.4.2 and creating an ISCSI lun on the NetApp controller.

24 Friday May 2013

Posted by Slice2 in NetApp, Windows

≈ Leave a comment

Tags

NetApp, Windows

A friend was having issues setting up iSCSI on Windows 2003 with a NetApp storage array. I know what you are thinking…, “Dude, 32 bit Windows 2003 is totally obsolete! Why would you still be running an OS with a Mainstream Support End Date of 2010?”

Well, this is what they have at the moment so I created a VM to create this HOWTO and figured I would post it in hopes of helping others.

This HOWTO covers installing the Microsoft iSCSI Initiator v2.08 on Windows 2003, Microsoft patches specific to the Windows Storport and storage subsystem, NetApp DSM 4.0 and NetApp SnaDrive for Windows 6.4.2 (v6.5 is not supported on Windows 2003). It does not cover the process of enabling Mutual CHAP but I guess I can add that at a later date. Although CHAP is weak from a security standpoint, its better than nothing I guess.

The HOWTO is here: iSCSI on Windows with NetApp

SoftPerfect Netscan vs. AngryIP

23 Thursday May 2013

Posted by Slice2 in Security, Windows

≈ Leave a comment

Tags

Security, Windows

I set out to do a quick comparison between SoftPerfect Network Scanner (Netscan) and AngryIP because AngryIP seems to get more love. I don’t know why. Just spend 5 minutes with SoftPerfect Network Scanner and you will abandon AngryIP in a heartbeat. SoftPerfect Network Scanner is clearly a better application. Its faster, highly configurable and more feature rich than AngryIP. SoftPerfect Network Scanner is a must have for all Sysadmin or Security professionals.

Both are standalone executable for Windows so no installation is required. The scan results below (with defaults enabled) proves the speed test. Netscan is much faster.

AngryIP
Version: v3.2
Speed: 5 minutes to scan a /24
Max Threads: 10 threads at a time

SoftPerfect Network Scanner (Netscan)
Version: 5.4.11
Speed: 1 minute and 5 seconds to scan a /24
Max Threads: 50 theads at a time

See the .pdf for the interface differences between SoftPerfect Network Scanner and AngryIP here: Netscan vs AngryIP

Take them both for a spin and see for yourself.

SoftPerfect Network Scanner URL:
http://www.softperfect.com/products/networkscanner/?from=auto

AngryIP URL:
http://angryip.org/w/Home

Newer posts →

Follow Blog via Email

Enter your email address to follow this blog and receive notifications of new posts by email.

Recent Posts

  • Patch Alma Linux 8.7 on an Offline or Air-Gapped System
  • HOWTO Remove /home logical volume and add that space to the root partition
  • Patch Rocky Linux 8.6 on an Offline or Air-Gapped System
  • HOWTO Install the Splunk Universal Forwarder on FreeBSD
  • HOWTO install a Splunk Universal Forwarder on Solaris 11 SPARC and x64 Using pkg(p5p) and tar
  • HOWTO install a Splunk Universal Forwarder on Solaris 10 SPARC and x64 Using pkgadd and tar
  • Recover Files from a Windows NTFS partition using Linux based SystemRescue
  • Sysmon Event ID 1 Process Creation rules for Splunk Universal Forwarder and McAfee All Access
  • Upgrading CentOS 7.2003 to 7.2009 on an Offline or Air-Gapped System
  • HOWTO Easily Resize the Default LVM Volume on Ubuntu 18.04
  • Create a Docker Container for your Cisco ESA, SMA or WSA Offline Content Updates
  • Apply the Mozilla Firefox STIG to Firefox on Ubuntu Linux 18.04
  • Dynamically Resize Those Tiny BlackArch Linux Terminals and Add a Scrollbar
  • Kali Linux OVA for Air-Gapped Use Build Process
  • HOWTO install the XFCE 4 Desktop on NetBSD 8.1
  • Build a Kali Linux ISO with the latest OS patches and packages
  • HOWTO quickly STIG Firefox 59.01
  • HOWTO mount a Synology NAS SMB share on Linux with SMBv1 disabled
  • Howto safely delete the WSUS WID on Windows 2012R2
  • HOWTO quickly STIG Firefox 45.0.1
  • Completing the vSphere vCenter Appliance Hardening Process
  • HOWTO install the XFCE 4.12 Desktop on NetBSD 7
  • Enabling TLS 1.2 on the Splunk 6.2x Console and Forwarders using Openssl and self signed certs.
  • HOWTO enable SSH on a Cisco ASA running 9.1.x
  • Apply a Windows 2012 R2 Domain GPO to a standalone Windows 2012 R2 server
  • Enable legacy SSL and Java SSL support in your browser for those old, crusty websites
  • HOWTO update FreeBSD 10.1 to the latest 11-current release
  • HOWTO Secure iSCSI Luns Between FreeBSD 10.1 and NetApp Storage with Mutual CHAP
  • HOWTO install the XFCE 4 Desktop on NetBSD 6.1.5
  • HOWTO Secure iSCSI Luns Between Ubuntu Server 14.10 and NetApp Storage with Mutual CHAP

Categories

  • Cisco (2)
  • ESXi (4)
  • FreeBSD (2)
  • HP (5)
  • iSCSI (12)
  • Linux (31)
  • Nessus (3)
  • NetApp (31)
  • NetBSD (10)
  • Oracle (9)
  • Security (48)
  • Solaris (9)
  • Splunk (5)
  • VMware (19)
  • Windows (20)
  • Wireshark (4)
  • XFCE (3)

Archives

  • February 2023
  • August 2022
  • July 2022
  • April 2022
  • March 2022
  • February 2022
  • January 2022
  • November 2021
  • January 2021
  • December 2020
  • November 2020
  • August 2020
  • May 2020
  • September 2019
  • August 2019
  • March 2018
  • November 2016
  • March 2016
  • January 2016
  • November 2015
  • July 2015
  • June 2015
  • February 2015
  • January 2015
  • December 2014
  • November 2014
  • October 2014
  • September 2014
  • August 2014
  • July 2014
  • May 2014
  • April 2014
  • March 2014
  • February 2014
  • January 2014
  • December 2013
  • November 2013
  • October 2013
  • September 2013
  • August 2013
  • July 2013
  • June 2013
  • May 2013
  • April 2013
  • March 2013

Blogroll

  • Adobe Security Bulletins
  • CentOS Blog
  • Cisco Security Blog
  • CSO Magazine
  • DHS National Vulnerability Database
  • Eric Sloof's NTPRO
  • HT SSL Tests
  • Intel Corp Security Advisories
  • Internet Usage World Stats
  • Kali Linux Blog
  • Linux Mint Blog
  • Meltdown and Spectre
  • Microsoft Security Blog
  • Microsoft Security Intelligence Report
  • Microsoft Security Research & Defense
  • Microsoft Security Response Center
  • MITRE CVE Site
  • NetApp Blogs
  • NetBSD Blog
  • Oracle OTN Security
  • Oracle Security Blog
  • PacketStorm
  • Redhat Security Blog
  • SC Magazine
  • Shodan Search Engine
  • US-CERT Alerts
  • US-CERT Bulletins
  • US-CERT Vulnerability Notes KB
  • VMware Blogs
  • VMware Security Advisories

Category Cloud

Cisco ESXi FreeBSD HP iSCSI Linux Nessus NetApp NetBSD Oracle Security Solaris Splunk VMware Windows Wireshark XFCE

Follow Blog via Email

Enter your email address to follow this blog and receive notifications of new posts by email.

Join 41 other subscribers

Powered by WordPress.com.

Loading Comments...