Tags
This is a security/bugfix update of the NetBSD 6.1 release branch.
Details here:
http://www.netbsd.org/releases/formal-6/NetBSD-6.1.2.html
Download mirrors:

09 Wednesday Oct 2013
Posted in NetBSD
Tags
This is a security/bugfix update of the NetBSD 6.1 release branch.
Details here:
http://www.netbsd.org/releases/formal-6/NetBSD-6.1.2.html
Download mirrors:
09 Wednesday Oct 2013
Despite what Microsoft has stated you need to generate a new SID when using Windows 2008 images. On Windows 2008, you can use the native sysprep.exe utility. Note that running sysprep.exe will reset your hostname, IP and local Administrator password. When done generating a new SID you have to change your hostname, password and set your IP. If you want to see the before and after SID, download the PStools package at the URL below and run psgetsid.exe before you sysprep and then after.
http://technet.microsoft.com/en-us/sysinternals/bb896649
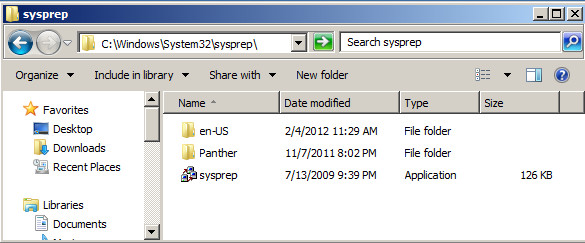
1) Open Windows explorer and browse to C:\Windows\System32\sysprep and double-click sysprep.exe.
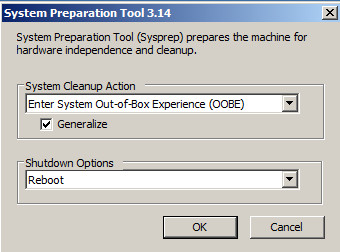
2) Make sure the Generalize option is checked under System Cleanup Action and click OK.
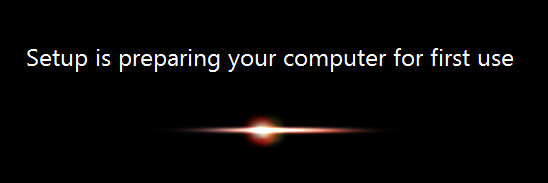
3) When the system reboots it automatically prepares it for first use.
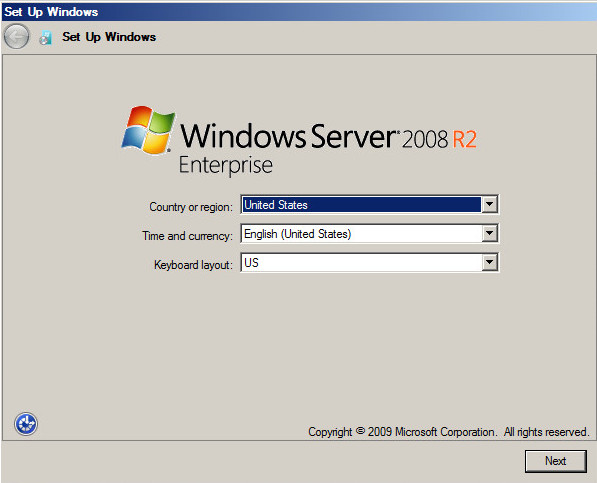
4) On the Windows Setup screen, select your county, language and click Next.
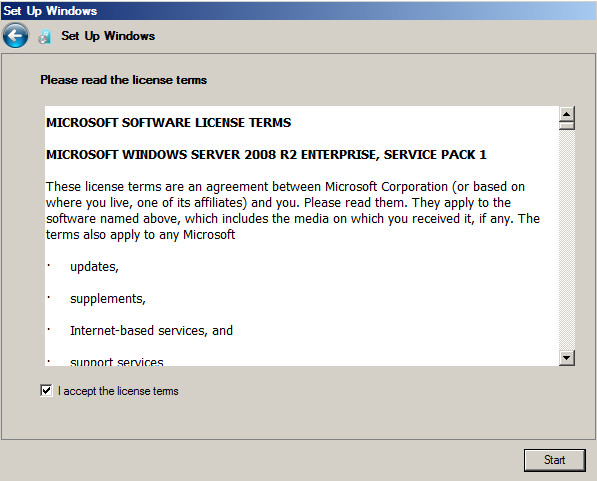
5) Accept the license and click Start.
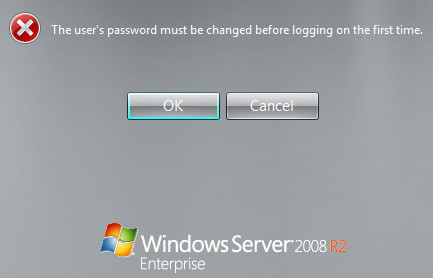
6) Click OK to set the local Administrator password.
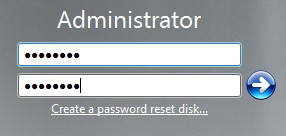
7) Enter a password and click the blue arrow to complete the setup. The system will log you in. Make sure you change your hostname and IP before you join the domain. Also, if the old server object is still in AD, delete it before joining the domain.
28 Saturday Sep 2013
This post demonstrates how to enable two-way or mutual CHAP on iSCSI luns between Debian Linux 7.1 and NetApp storage. The aggregate, lun and disk sizes are small in this HOWTO to keep it simple.
1) Install open-iscsi on your server.
> apt-get install open-iscsi
> reboot (don’t argue with me, just do it!)
2) Display your server’s new iscsi initiator or iqn nodename.
> cat /etc/iscsi/initiatorname.iscsi
InitiatorName=iqn.1993-08.org.debian:01:e6d4ee61d916
3) On the NetApp filer, create the volume that will hold the iscsi luns. This command assumes you have aggregrate aggr1 already created. If not use an aggregate that has enough room for your volume.
netapp> vol create MCHAPVOL aggr1 10g
4) Create the lun in the volume.
netapp> lun create -s 5g -t linux /vol/MCHAPVOL/DEB71_iSCSI_MCHAP_01
5) Create an igroup and add the Linux iscsi nodename or iqn from step 2 above to it.
netapp> igroup create -i -t linux ISCSI_MCHAP_DEB71
netapp> igroup add ISCSI_MCHAP_DEB71 iqn.1993-08.org.debian:01:e6d4ee61d916
netapp> igroup show
ISCSI_MCHAP_DEB71 (iSCSI) (ostype: linux):
iqn.1993-08.org.debian:01:e6d4ee61d916 (not logged in)
6) Map the lun to the iscsi-group and give it lun ID 01.
netapp> lun map /vol/MCHAPVOL/DEB71_iSCSI_MCHAP_01 ISCSI_MCHAP_DEB71 01
7) Obtain the NetApp target nodename.
netapp> iscsi nodename
iqn.1992-08.com.netapp:sn.84167939
8) Set the CHAP secret on the NetApp controller.
netapp> iscsi security add -i iqn.1993-08.org.debian:01:e6d4ee61d916 -s chap -p MCHAPDEB71 -n iqn.1993-08.org.debian:01:e6d4ee61d916 -o NETAPPMCHAP -m iqn.1992-08.com.netapp:sn.84167939
netapp> iscsi security show
init: iqn.1993-08.org.debian:01:e6d4ee61d916 auth: CHAP Inbound password: **** Inbound username: iqn.1993-08.org.debian:01:e6d4ee61d916 Outbound password: **** Outbound username: iqn.1992-08.com.netapp:sn.84167939
9) On the server, edit your /etc/iscsi/iscsi.conf file and set the parameters below.
> vi /etc/iscsi/iscsid.conf:
node.startup = automatic
node.session.auth.authmethod = CHAP
node.session.auth.username = iqn.1993-08.org.debian:01:e6d4ee61d916
node.session.auth.password = MCHAPDEB71
node.session.auth.username_in = iqn.1992-08.com.netapp:sn.84167939
node.session.auth.password_in = NETAPPMCHAP
discovery.sendtargets.auth.authmethod = CHAP
discovery.sendtargets.auth.username = iqn.1993-08.org.debian:01:e6d4ee61d916
discovery.sendtargets.auth.password = MCHAPDEB71
discovery.sendtargets.auth.username_in = iqn.1992-08.com.netapp:sn.84167939
discovery.sendtargets.auth.password_in = NETAPPMCHAP
> wq!
10) On the server, discover your iSCSI target (your storage system).
> iscsiadm -m discovery -t st -p 10.10.10.11
10.10.10.11:3260,1000 iqn.1992-08.com.netapp:sn.84167939
> iscsiadm -m node (this should display the same as above)
10.10.10.11:3260,1000 iqn.1992-08.com.netapp:sn.84167939
11) On the server, manually login to the iSCSI target (your storage array).
> iscsiadm -m node –targetname “iqn.1992-08.com.netapp:sn.84167939” –login
Logging in to [iface: default, target: iqn.1992-08.com.netapp:sn.84167939, portal: 10.10.10.11,3260] (multiple)
Login to [iface: default, target: iqn.1992-08.com.netapp:sn.84167939, portal: 10.10.10.11,3260] successful.
On the NetApp storage console you should see the iSCSI sessions:
[iscsi.notice:notice]: ISCSI: New session from initiator iqn.1993-08.org.debian:01:e6d4ee61d916 at IP addr 10.10.10.203
[iscsi.notice:notice]: ISCSI: New session from initiator iqn.1993-08.org.debian:01:e6d4ee61d916 at IP addr 10.10.10.203
Verify the iSCSI session on the filer:
netapp> iscsi session show
Session 49
Initiator Information
Initiator Name: iqn.1993-08.org.debian:01:e6d4ee61d916
ISID: 00:02:3d:01:00:00
Initiator Alias: deb71
12) Stop and start the iscsi service on the server.
> service open-iscsi stop
Pause for 10 seconds and then run the next command.
> service open-iscsi start
[ ok ] Starting iSCSI initiator service: iscsid.
[….] Setting up iSCSI targets:
Logging in to [iface: default, target: iqn.1992-08.com.netapp:sn.84167939, portal: 10.10.10.11,3260] (multiple)
Login to [iface: default, target: iqn.1992-08.com.netapp:sn.84167939, portal: 10.10.10.11,3260] successful.
. ok
[ ok ] Mounting network filesystems:.
13) From the server , check your session.
> iscsiadm -m session -P 1
14) From the server, check the NetApp iSCSI details.
> iscsiadm –mode node –targetname “iqn.1992-08.com.netapp:sn.84167939” –portal 10.10.10.11:3260
15) From the server, find and format the new lun (new disk).
> cat /var/log/messages | grep “unknown partition table”
deb71 kernel: [ 1856.751777] sdb: unknown partition table
> fdisk /dev/sdb
Device contains neither a valid DOS partition table, nor Sun, SGI or OSF disklabel
Building a new DOS disklabel with disk identifier 0x07f6c360.
Changes will remain in memory only, until you decide to write them.
After that, of course, the previous content won’t be recoverable.
Warning: invalid flag 0x0000 of partition table 4 will be corrected by w(rite)
Command (m for help): w
The partition table has been altered!
Calling ioctl() to re-read partition table.
Syncing disks.
Command (m for help): n
Partition type:
p primary (0 primary, 0 extended, 4 free)
e extended
Select (default p): p
Partition number (1-4, default 1): 1
First sector (2048-10485759, default 2048): press enter
Using default value 2048
Last sector, +sectors or +size{K,M,G} (2048-10485759, default 10485759): press enter
Using default value 10485759
Command (m for help): p
Disk /dev/sdb: 5368 MB, 5368709120 bytes
166 heads, 62 sectors/track, 1018 cylinders, total 10485760 sectors
Units = sectors of 1 * 512 = 512 bytes
Sector size (logical/physical): 512 bytes / 512 bytes
I/O size (minimum/optimal): 512 bytes / 512 bytes
Disk identifier: 0x07f6c360
Device Boot Start End Blocks Id System
/dev/sdb1 2048 10485759 5241856 83 Linux
Command (m for help): w
The partition table has been altered!
Calling ioctl() to re-read partition table.
Syncing disks.
Command (m for help): q
16) On the server, create the Linux file system on the new partition.
> mkfs -t ext4 /dev/sdb1
mke2fs 1.42.5 (29-Jul-2012)
Filesystem label=
OS type: Linux
Block size=4096 (log=2)
Fragment size=4096 (log=2)
Stride=0 blocks, Stripe width=0 blocks
327680 inodes, 1310464 blocks
65523 blocks (5.00%) reserved for the super user
First data block=0
Maximum filesystem blocks=1342177280
40 block groups
32768 blocks per group, 32768 fragments per group
8192 inodes per group
Superblock backups stored on blocks:
32768, 98304, 163840, 229376, 294912, 819200, 884736
Allocating group tables: done
Writing inode tables: done
Creating journal (32768 blocks): done
Writing superblocks and filesystem accounting information: done
17) Verify the partition.
> blkid /dev/sdb1
/dev/sdb1: UUID=”afba2daf-1de8-4ab1-b93e-e7c99c82c054″ TYPE=”ext4″
18) Create the mount point and manually mount the directory.
> mkdir /newiscsilun
> mount /dev/sdb1 /newiscsilun
> df -h | grep newiscsilun
Filesystem Size Used Avail Use% Mounted on
/dev/sdb1 5.0G 10M 4.7G 1% /newiscsilun
19) Add the new mount point to /etc/fstab.
> vi /etc/fstab
/dev/sdb1 /newiscsilun ext4 _netdev 0 0
> wq!
Note: the _netdev option is important so that it doesn’t try mounting the target before the network is available.
20) Test that it survives a reboot by rebooting the server. With the _netdev set, iscsi starts and your CHAP logins should take place before it attempts to mount. After the reboot, login and verify its mounted.
> df -h | grep newiscsilun
Filesystem Size Used Avail Use% Mounted on
/dev/sdb1 5.0G 10M 4.7G 1% /newiscsilun
21) On the server you can check session stats.
> iscsiadm -m session -s
Stats for session [sid: 1, target: iqn.1992-08.com.netapp:sn.84167939, portal: 10.10.10.11,3260]
iSCSI SNMP:
txdata_octets: 69421020
rxdata_octets: 765756
noptx_pdus: 0
scsicmd_pdus: 365
tmfcmd_pdus: 0
login_pdus: 0
text_pdus: 0
dataout_pdus: 924
logout_pdus: 0
snack_pdus: 0
noprx_pdus: 0
scsirsp_pdus: 365
tmfrsp_pdus: 0
textrsp_pdus: 0
datain_pdus: 193
logoutrsp_pdus: 0
r2t_pdus: 924
async_pdus: 0
rjt_pdus: 0
digest_err: 0
timeout_err: 0
iSCSI Extended:
tx_sendpage_failures: 0
rx_discontiguous_hdr: 0
eh_abort_cnt: 0
22) As root, change permissions on /etc/iscsi/iscsid.conf. I’m not sure why they haven’t fixed this clear text CHAP password in a file issue so just make sure only root can read/write the file.
> chmod 600 /etc/iscsi/iscsid.conf
23) On the NetApp storage you can verify the Lun and the server’s session.
> lun show -v /vol/MCHAPVOL/DEB71_iSCSI_MCHAP_01
/vol/MCHAPVOL/DEB71_iSCSI_MCHAP_01 5g (5368709120) (r/w, online, mapped)
Serial#: hoagPJtrPZCi
Share: none
Space Reservation: enabled
Multiprotocol Type: linux
Maps: ISCSI_MCHAP_DEB71=1
> iscsi session show -v
Session 55
Initiator Information
Initiator Name: iqn.1993-08.org.debian:01:e6d4ee61d916
ISID: 00:02:3d:01:00:00
Initiator Alias: deb71
Session Parameters
SessionType=Normal
TargetPortalGroupTag=1000
MaxConnections=1
ErrorRecoveryLevel=0
AuthMethod=CHAP
HeaderDigest=None
DataDigest=None
ImmediateData=Yes
InitialR2T=No
FirstBurstLength=65536
MaxBurstLength=65536
Initiator MaxRecvDataSegmentLength=65536
Target MaxRecvDataSegmentLength=65536
DefaultTime2Wait=2
DefaultTime2Retain=0
MaxOutstandingR2T=1
DataPDUInOrder=Yes
DataSequenceInOrder=Yes
Command Window Size: 32
Connection Information
Connection 0
Remote Endpoint: 10.10.10.203:57127
Local Endpoint: 10.10.10.11:3260
Local Interface: e0a
TCP recv window size: 131400
19 Thursday Sep 2013
The BSD variants make it difficult to quickly determine your iSCSI initiator name or iqn but I’m told they are working on a solution. While sniffing packets is an effective method of discovery, it’s simply far to cumbersome in a busy IT shop. If you know of an easier way to display the initiator please add a comment below and I’ll post it. This post is a followup to my previous list of ways to display initiators on various platforms. I have not tested this with the other BSD variants but assume the packets would be the same.
1) Install Wireshark on the NetBSD server.
> pkg_add wireshark
2) Make sure iscsi is started on the NetBSD server.
> iscsid
3) Add your storage array (your target that will present the lun)
> iscsictl add_send_target -a 10.10.10.11
Added Send Target 1
4) Refresh your target list.
> iscsictl refresh_targets
OK
5) List your targets.
> iscsictl list_targets
1: iqn.1992-08.com.netapp:sn.84167939
2: 10.10.10.11:3260,1000
6) Launch Wireshark.
> wireshark
6a) In the Wireshark GUI, click Capture > Start to initiate packet sniffing.
8) Login to the target. In this case we’ll use target 2.
> iscsictl login -P 2
Created Session 2, Connection 1
9) List your iscsi session with your target (storage array).
> iscsictl list_sessions
Session 2: Target iqn.1992-08.com.netapp:sn.84167939
10) Stop the packet sniffing.
a) Click on Capture > Stop.
Note: click image to enlarge. The next two steps are depicted in this image.

b) In the upper left, in the Filter: field enter “iscsi.isid” without the quotes and on the right click Apply.
11) Select the first packet from your server. In the middle expand iSCSI (Login Command), and then expand Key/Value Pairs. The first entry should list the InitiatorName= value. That is your iSCSI initiator or host iqn. In this case it’s iqn.1994-04.org.netbsd:iscsi.nbsd611.lab.slice2.com.
01 Sunday Sep 2013
Tags
At some point you will be asked by a Storage Engineer for your system’s iSCSI Initiator Node Name or your iqn. This list shows you how to get your local iSCSI initiator name or iqn from the command line. This assumes the iSCSI service is installed, enabled and running. If you have a different way or want to add an OS or platform to this list simply leave a comment and I’ll add it.
AIX:
> smitty iscsi
select > iSCSI Protocol Device
select > Change / Show Characteristics of an iSCSI Protocol Device
FreeBSD (v10 and newer. Thanks to Edward Tomasz Napierala for this update):
> iscsictl -v (only after you have established a session with your array)
HP-UX:
> iscsiutil -l
Linux:
> cat /etc/iscsi/initiatorname.iscsi
NetApp Data ONTAP: (this is a target iqn not a host iqn)
7-Mode:
> iscsi nodename
Cluster Mode from the clustershell:
> vserver iscsi show
NetBSD: (please make this easier NetBSD developers! How about an iscsictl list_initiators command?)
> iscsictl add_send_target -a <hostname or IP of your target/storage)
Added Send Target 1
> iscsictl refresh_targets
OK
> iscsictl list_targets
1: iqn.1992-08.com.netapp:sn.84167939
2: 10.1.0.25:3260,1000
> iscsictl login -P 2
Created Session 2, Connection 1
> iscsictl list_sessions
Session 2: Target iqn.1992-08.com.netapp:sn.84167939
On the NetApp filer find the initiator:
netapp01> iscsi initiator show
Initiators connected:
TSIH TPGroup Initiator/ISID/IGroup
4 1000 nbsd611.lab.slice2.com (iqn.1994-04.org.netbsd:iscsi.nbsd611.lab.slice2.com:0 / 40:00:01:37:00:00 / )
Solaris 11:
> iscsiadm list initiator-node
VMware ESXi 5.1:
ESXi console:
Get the devices first:
> esxcfg-scsidevs -a | grep iSCSI
Then get the iqn (in this case vmhba33 is the iSCSI device)
> vmkiscsi-tool -I -l vmhba33
esxcli:
> esxcli -s <esxihostname or ip> -u root iscsi adapter get -A vmhba33
Windows:
c:\iscsicli.exe
30 Friday Aug 2013
These are major new versions with much needed support for cDOT 8.2, Powershell and SMB 3.
SnapDrive 7.0 for Windows
http://support.netapp.com/NOW/download/software/snapdrive_win/7.0/
SnapDrive 7.0 for Windows is a major release, adding support for the following features:
1) Clustered Data ONTAP 8.2
2) Sub-LUN cloning in restore operations
3) PowerShell cmdlet support in SMB 3.0 enviornments
4) Volume and share provisioning template in SMB 3.0 environments
5) Virtual Fibre Channel
6) Group Managed Service Accounts (gMSA) on Windows Server 2012
SnapManager 7.0 for Microsoft SQL Server
http://support.netapp.com/NOW/download/software/snapmanager_sql2k/7.0/
SnapManager 7.0 for Microsoft SQL Server includes several new features:
1) Support for clustered Data ONTAP 8.2.
2) Support for databases running on clustered Data ONTAP SMB 3.0 shares.
Note: Specify SMB shares with or without a closing backslash: \\ServerName\ShareName or \\ServerName\ShareName\
3) Support for archiving backups to SnapVault secondary volumes running on clustered Data ONTAP.
5) The option to restore databases to a different location on the same Microsoft SQL Server instance.
6) Performance improvements when restoring databases from a LUN that stores multiple databases.
7) The Backup report now includes the cmdlet syntax for database backups initiated from the Backup wizard or Backup and Verify option.
8) Support for running SnapManager from a group Managed Service Account.
Read these URLs to see why you should be interested in SMB 3.0.
http://blogs.technet.com/b/filecab/archive/2012/05/03/smb-3-security-enhancements-in-windows-server-2012.aspx
http://networkerslog.blogspot.com/2012/09/new-storage-space-on-smb30-in-windows.html
http://blogs.technet.com/b/windowsserver/archive/2012/04/19/smb-2-2-is-now-smb-3-0.aspx
21 Wednesday Aug 2013
Secure your virtual infrastructure by using the following guidelines.
1) The DISA STIGs for vSphere 5 have been released:
http://iase.disa.mil/stigs/os/virtualization/esx.html
2) The VMware vSphere Hardening Guide is here:
http://blogs.vmware.com/vsphere/2013/04/vsphere-5-1-hardening-guide-official-release.html
17 Saturday Aug 2013
Posted in NetApp
Tags
This is a relatively unknown plugin for DFM/Operations Manager, now called OnCommand Unified Manager. The Plugin helps to answer a number of questions related to storage utilization and storage efficiency savings. It also helps in identifying ways to improve the storage utilization. It is implemented as a script that can be installed on the Operations Manager server. The script can be scheduled for execution in Operations Manager and generates a set of web pages that provide an Efficiency Dashboard for the NetApp storage systems managed by Operations Manager. Two primary charts are produced with additional charts to provide detailed breakdowns of how the storage space is being consumed. These charts can be produced to represent all storage systems being monitored by Operations Manager, ‘groups’ of storage systems as grouped in Operations Manager or a single storage system. I wonder why they don’t include this as a tab inside OnCommand Unified Manager by default.
Note: click images to see a larger version.
Download it from here:
http://support.netapp.com/NOW/download/tools/omsed_plugin/
1) To install from the OnCommand Unified Manager browser interface:
a) Login to Operations Manager as an administrator. Click Management > Scripts.
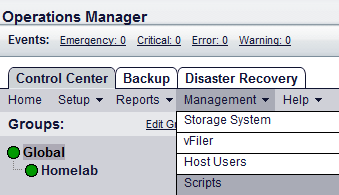
b) On the Scripts page choose the option to select the omeff_oc52_windows64.zip file you downloaded above and click Add Script.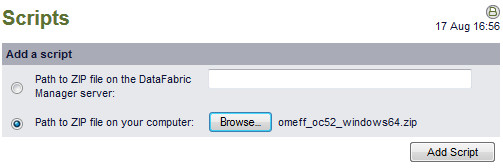
c) On the Confirm page, read the summary and click Add.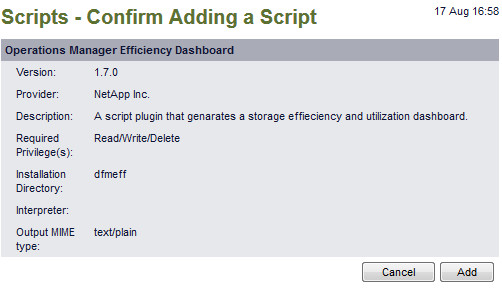
d) After the script is installed, in the lower section, select the script check box and click “No” under the Schedule column.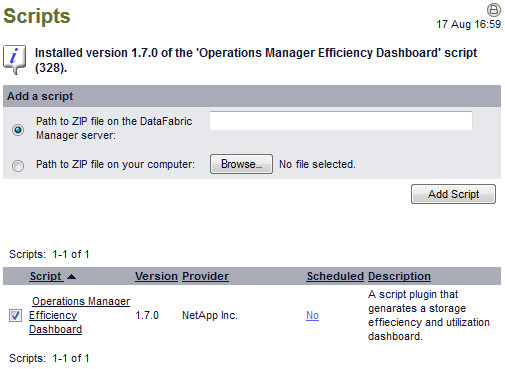
e) On the add a schedule page, enter a name for the plugin such as Storage Efficiency Plugin and at the bottom, enter the schedule of your choice. I run it daily at 05:00 AM. Click Add Schedule when done and you should see the schedule you chose.
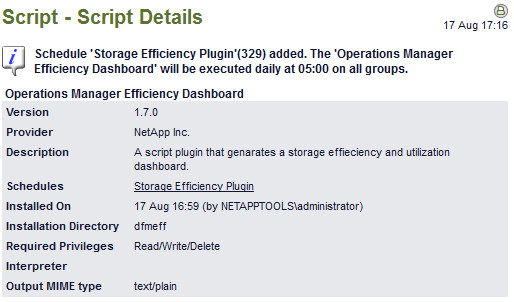
2) If you want to install from the the OnCommand Unified Manager CLI:
C:\Program Files\NetApp\DataFabric Manager\DFM\bin\dfm script add omeff_oc52_windows64.zip
3) Access the Dashboard. After the script has run the first time, the dashboard will be available. Its located at the root on your OnCommand URL. Just add /dashboard.html at the end as shown in the example below.
https://nocumc.lab.slice2.com:8443/dashboard.html

16 Friday Aug 2013
Posted in NetApp
Tags
1) Data ONTAP PowerShell Toolkit v3 (access with free community site account)
https://communities.netapp.com/docs/DOC-22259
The new version adds support for clustered ONTAP 8.2 with 67 new cmdlets.
2) OnCommand Systems Manager v3 (you need a support contract to download)
http://support.netapp.com/NOW/download/software/systemmgr_win/3.0/
Of particular note if you still have DOT7 systems:
The installer installs both System Manager 3.0 and System Manager 2.2.0.1. System Manager 3.0 enables you to manage clustered Data ONTAP systems and System Manager 2.2.0.1 enables you to manage 7-Mode systems. System Manager 2.2.0.1 supports all the features, enhancements, and changes in the System Manager 2.2 release.
System Manager 3.0 is launched in a new browser tab or window if you are managing clustered Data ONTAP systems. Similarly, System Manager 2.2.0.1 is launched in a new browser tab or window if you are managing 7-Mode systems.
02 Friday Aug 2013
Posted in NetApp
Tags
I believe this feature has been around since the DFM v4.x releases. If you haven’t noticed, DFM has been re-branded to NetApp OnCommand Unified Manager. There are Core and Host packages. You can download the latest v5.2 release here. You need a support contract to access the site.
Note- click images in the post below to increase size.
The NetApp OnCommand Unified Manager Core package bundles a great performance analysis tool built into the NetApp Management Console. Once you install OnCommand Unified Manager Core, its available in two locations:
1) C:\Program Files\NetApp\DataFabric Manager\DFM\web\clients\nmconsole-setup-3-3-win32.exe.
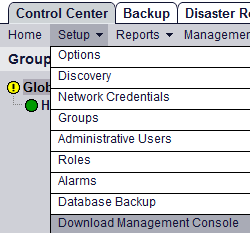
2) Start > NetApp > DataFabric Manager > Show Appliance Summary Page > click Setup > click Download Management Console.
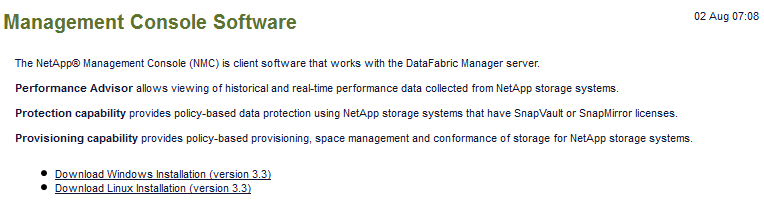
2a) Click Download Windows Installation (version 3.3) and save it locally.
Install the Management Console on your workstation or server.
1) Double-click nmconsole-setup-3-3-win32.exe > Next > Install > Next > Finish. It will launch when done.
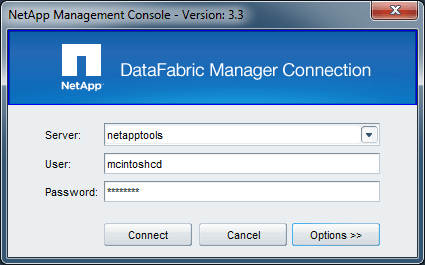
2) Enter your OnCommand Unified Manager server name or IP, username and password and click connect. Note you can click Options and switch between http and https. Hopefully you are using https.
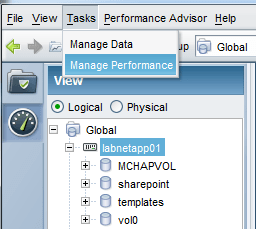
3) In the upper left, click Tasks > Manage Performance. Under View, select Logical and click the controller that you want to assess.
4) In a few seconds the page will render. On the right, just above the Network Throughput diagnostic panel, click View Actions > Diagnostics.
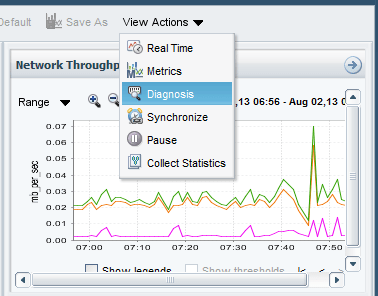
5) You will see either green, yellow or red as indicators of the health check category. Click on each and see what is available. In this case, when you select NAS Specific Issues, it says that Atime updates are enabled on the volumes. See the recommendation at the bottom and correct as needed.

Note: You can sometimes improve performance by directing Data ONTAP to skip logging of access time (atime) information to NVRAM. The downside is that if there is a storage system crash, a few seconds worth of access time updates may not be recorded in the file system.
To make the change:
> vol options <your_vol_name> no_atime_update on
6) In this image for SAN Specific Issues, you can see it has detected LUN partial read/write issues. Assess the recommendations and make changes as needed.
Note: notice on the left that you can adjust the date and time of the diagnostic. This is useful when you want to assess a change you made to an NFS mount, for example rsize=8192,wsize=8192, or maybe a realigned LUN, etc. You can go back in time and correlate the diagnostic and performance data.

7) See TR-4090 (page 46) for Diagnostic tests and meanings.